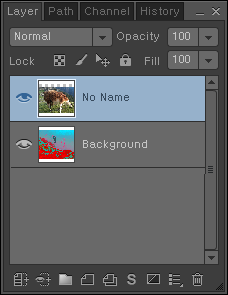
Layers <F7>
You can check your working history and some information such as channel and carry on actions conveniently.
Steps
To work on a layer
- Open at least two photos that must have the same channel.
- Click Window > Layers.
- In the Layer tab of the window, double click on the 'Background' image to change it to a layer.
- Click the Transform
 icon on Tool Box.
- Click on the photo, which is now a layer, and drag it onto another photo that is one of the photos in the same channel.
- Make sure that 'No Name' and 'Background are in the Layer tab and then double click on the No Name text.
- Remove the text No Name and enter a new name and then press ENTER.
- Click the Eye
 icon on 'Background' to make it invisible on the working canvas.
- Workin on the layer using the tools by clicking the Shape
 icon, Pen
  icon, Brush
  icon or any other icon.
- Click the Square
 icon on 'Background' to make it visible on the working canvas.
- Click File > Save As.
- In the Save As dialog box, save the photo file in Foxit Studio Photo (*.EZI) type.
To fill a path with a foreground color
- Click File > New and then create a blank canvas.
- Click Make > Pen or the Pen icon on Tool Box.
- Click the place where you want to start a path using the New Path
 mouse on a blank canvas.
- Click on each point to make a shape of a path using the Add Point
 mouse and then return the first place where you started the path.
- Click on the Path End
 mouse to finish the path job.
The mouse changes to the Path End mouse when you return the first place. If you make a line path, you can finish the path job by pressing ESC.
- Click Window > Layers.
- In the Path tab of the window, click the Paint with Path
 icon at bottom.
To hide green channel
- Opne the photo in RGB channel.
- Click Window > Layers.
- In the Layer tab of the window, click the Eye icon on the Green channel.
More Information
Layers Window
Layer Tab
You can make modifications or supplementations without damaging the original photo.
It is like working on a transparent film on top of the photo. If you add text or figures directly to a photo, you will need to delete parts of the photo, which can damage the original photo. In this case, you will be unable to recover the original photo later.
Path Tab
You can create and modify a vector type shape in Foxit Studio Photo.
Channel Tab
You can work on each color channel. Each color that composes a photo is called a channel.
History Tab
You can view the twenty most recent actions performed in Foxit Studio Photo. Regardless of the task sequences performed, you can quickly switch any of them.
See Also
Layer, Path, Channel, History, New, Tools, Options,