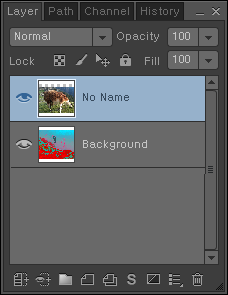
Layer
You can make modifications or supplementations without damaging the original photo. It is like working on a transparent film on top of the photo. If you add text or figures directly to a photo, you will need to delete parts of the photo, which can damage the original photo. In this case, you will be unable to recover the original photo later.
Steps
To create a new layer
- Open the photo you want to add a layer.
- Click Window > Layers.
- In the Layer tab of the window, click the Create a new layer
 icon at the bottom.
A new layer named 'Layer 1' is created in the layer list.
- Work on the Layer 1 using the tools by clicking the Shape
 icon, Pen
  icon, Brush
  icon or any other icon.
- Click the Eye
 icon on Layer 1 to make it invisible on the working canvas.
- Create another layer and perform other actions using tools.
- Click File > Save As.
- In the Save As dialog box, save the photo file in Foxit Studio Photo (*.EZI) type.
To work on a layer
- Open at least two photos that must have the same channel.
- Click Window > Layers.
- In the Layer tab of the window, double click on the 'Background' image to change it to a layer.
- Click the Transform
 icon on Tool Box.
- Click on the photo, which is now a layer, and drag it onto another photo that is one of the photos in the same channel.
- Make sure that 'No Name' and 'Background are in the Layer tab and then double click on the No Name text.

- Remove the text No Name and enter a new name and then press ENTER.
- Click the Eye
 icon on 'Background' to make it invisible on the working canvas.
- Work on the layer using the tools by clicking the Shape
 icon, Pen
  icon, Brush
  icon or any other icon.
- Click the Square
 icon on 'Background' to make it visible on the working canvas.
- Click File > Save As.
- In the Save As dialog box, save the photo file in Foxit Studio Photo (*.EZI) type.
See Also
Layers, Options, Adjust Color, Information, Color Palette
