Foxit eSign Overview
About Foxit eSign
Foxit eSign is a browser-based electronic signature service that allows you to prepare, deliver, and sign documents online. Foxit eSign streamlines signing and approval processes without the hassles of printing and transporting paper documents, which helps you do business faster while ensuring security and lower costs.
Key features include: Contract creation, reusable templates, document creation and collaboration, single or multiple eSignatures on document, online web link distribution for eSignatures, embedded online forms for website integration, bulk signatures, and more. If you need custom solutions, our team can work with you to fulfill your requirements.
Key steps of obtaining eSignatures with Foxit eSign
This section introduces the key steps you need to send a document or reusable template to the recipient for an eSignature.
Key Steps:
- Define Account Settings and Personal Account Settings
- Get an Envelope Signed on Foxit eSign
- Get a Reusable Template Signed on Foxit eSign
Define Your Account and Personal Profile Settings
Account Settings
- You can set up your account information fields in the “Accounts Settings” page after clicking “Settings” at the top of the Foxit eSign website.
- Date Format: Date format for your account will default while creating a document or template. The default date format can be modified for each document if required.
- If you are a Foxit eSign Pro or Foxit eSign Enterprise customer, you can upload your company logo that will appear on all Foxit eSign webpages and email communications in place of the Foxit eSign Logo.
Personal Profile Settings and Password Change
- On the top right of the screen, click on your name and then select ‘My Profile’ and then change the profile settings.
- You can change the notification settings according to your requirements.
Get an Envelope Signed on Foxit eSign
A Foxit eSign envelope is a virtual container allowing multiple related documents to be presented to signatories for signing. You can send documents for signatures by creating and sending a document envelope.
For documents that are custom and uniquely created each time before sending them to the recipients/senders, you should create an envelope and send it directly.
- Upload documents from your computer from the home page.
- Add the name of the recipient who needs to sign the document.
- Drag and drop your desired fields wherever you need them from the toolbox.
- Assign the property to the fields in the document, like the recipient responsible for filling in the value.
- You can also apply “Enforce Signing Sequence” to get the signatures in a sequence from the recipients.
- Before sending the envelope, you can modify the email subject and message which will go to the recipient.
- The recipient will get an invitation email which he/she will need to click on the view document(s) link in the email to read the document and sign it.
- You can check the history of the envelope to check the envelope status.
- Recipients can download the signed documents.
- You can also read the full guide: How to Create an envelope.
Get a Reusable Template Signed on Foxit eSign
For the documents that are common with the exception that they can be filled with different values for different recipients/signer, you can create reusable templates.
- Templates are a big time saver as you can re-use your most common documents.
Example: If you need the employee’s signature on “Employee Agreement” where the fields can be filled out differently each time and the remaining content remains same, you should create a reusable template and enable the field to be filled rather than uploading the document for each employee one by one. You can simply select one or more reusable templates and send them when required. Here are the quick steps on how to create a reusable template and send for eSignatures: - Upload a document from the computer or your cloud storage from the home screen under the ‘Create a Template’ section.
- Add party, drag and drop a field from options on left side toolbox fields, assign them to parties and mark mandatory or leave optional form field properties on the bottom-right by selecting the field.
- Once you are ready to send, click on ‘Send’.
- Now add the email address of the recipient(s) and assign them document permissions accordingly.
- You can also apply “Enforce Signing Sequence” to get the signatures in a sequence from the recipients.
- You can customize the subject and body of the email before sending the invitation to the recipient.
- Send the template and then check the status of your document by clicking on history to get the details.
- You can also read the full guide: How to Create a Reusable PDF Document Templates.
Workspace Overview
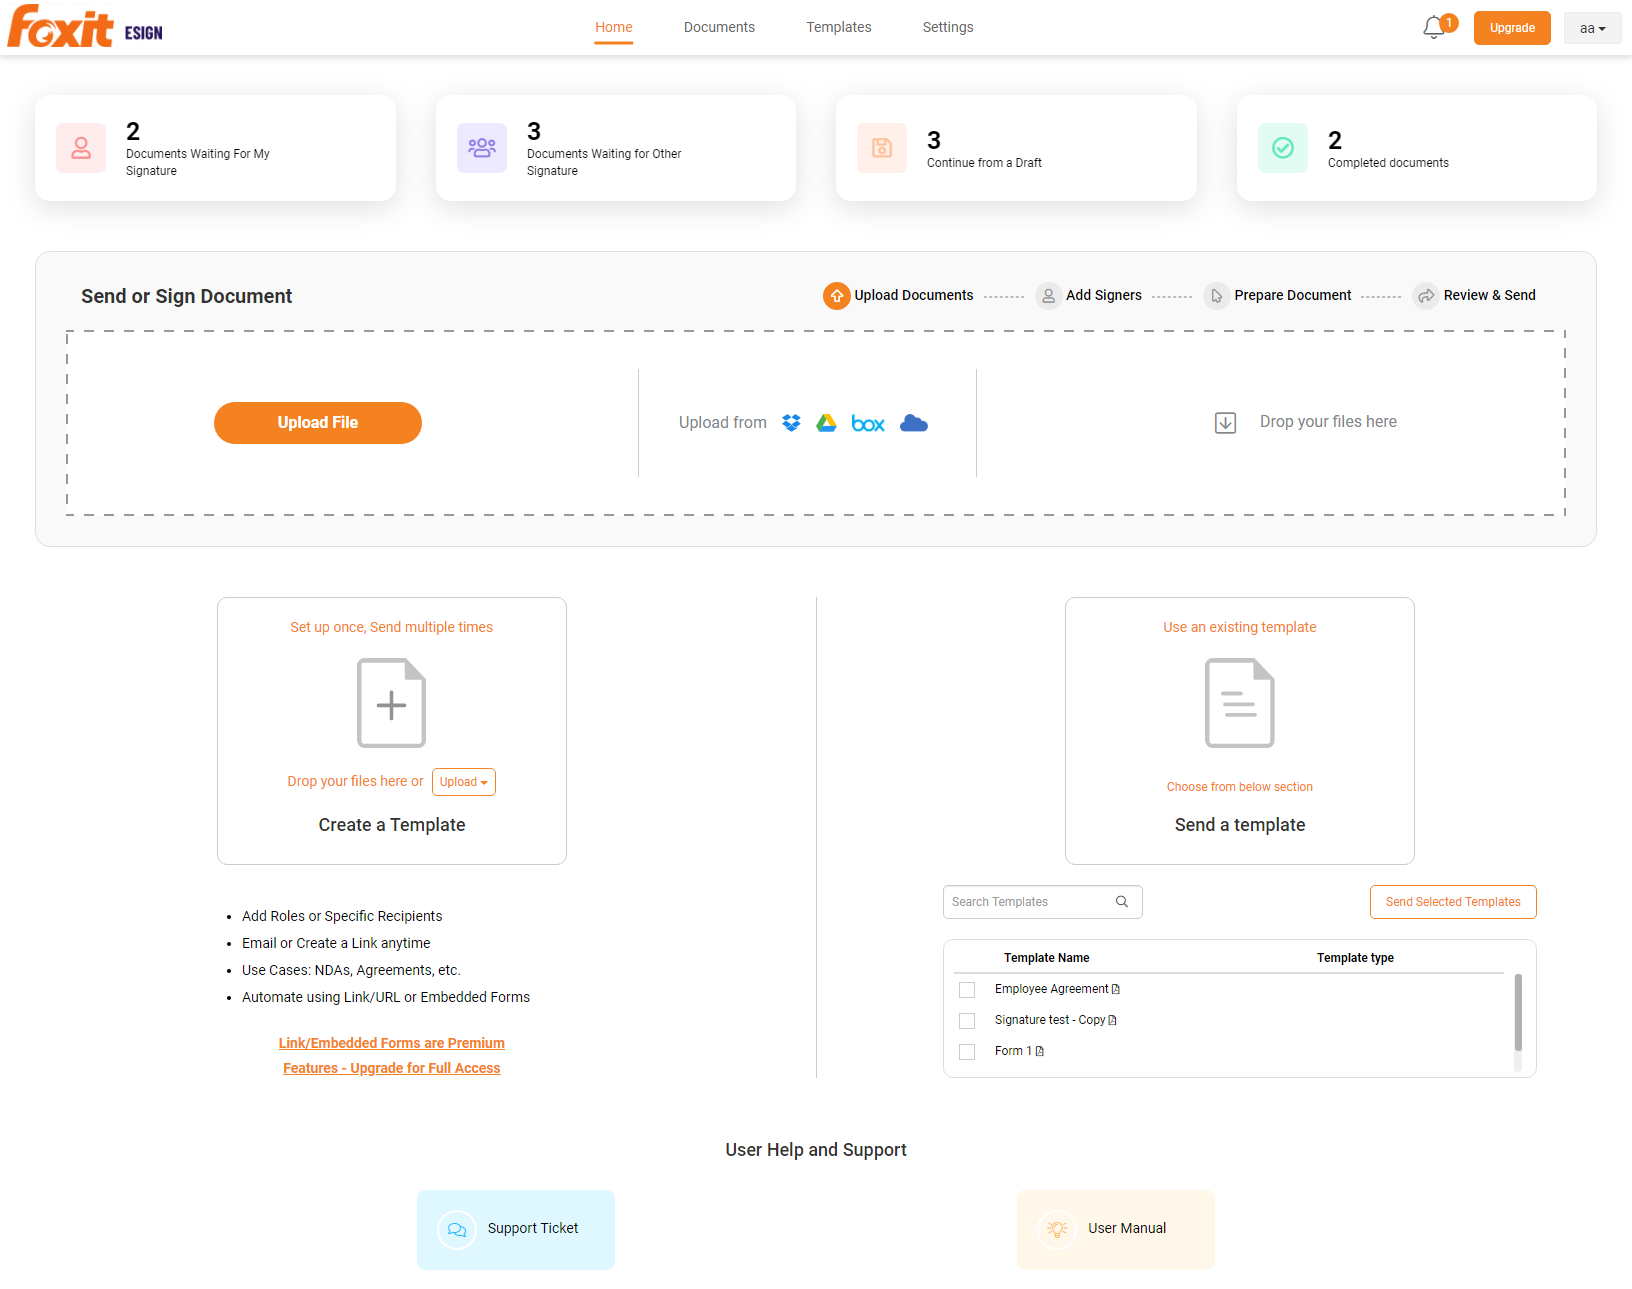
After logging in to your Foxit eSign account, you can view the homepage of the Foxit eSign website portal, where you can create a document or reusable template for an eSignature to get started.
The homepage also displays a summary of data for items such as how many documents are waiting for my signature, how many drafts (documents you have not yet sent out) you saved, and how many documents were completed, and you can click on an item for the details.

The Foxit eSign Homepage
Click Home, Documents, Templates, or Settings at the top of the Foxit eSign website to go to the related pages for more tasks.
- Home – clicking it takes you to the homepage of the Foxit eSign website.
- Documents – opens the Documents page to allow you to manage envelopes, online forms, bulk eSignatures, and more.
- Templates – opens the Templates page to view and manage existing templates.
- Settings – the Foxit eSign administration portal that allows you (administrator level user) to specify how your Foxit eSign account operates.
Click the inverted triangle icon ![]() in the top-right corner of the Foxit eSign website, and choose an option from the drop-down menu:
in the top-right corner of the Foxit eSign website, and choose an option from the drop-down menu:
- My Profile – click it to show your profile information like name and email address, and allows you to set language and time zone preferences.
- Logout – sign out of your account.
- Support Ticket – click it to submit a trouble ticket.
- User Manual – assuming you are reading this manual page, you probably know how to click User Manual.
Functionality and User Process Mapping
The below table shows the steps required for the associated functionality:
Functionality |
Functionality |
Account Management (Optional but recommended for productivity) |
|
Reusable Templates Save templates to expedite sending of commonly used documents/contracts. Signers can add attachment during filling out and signing. |
|
Document eSignatures Flow (if the document/contract is completely unique each time) |
|
Settings
Account settings are an optional setup for all accounts. Account settings enable you to personalize Foxit eSign field value such as the default date format, apply your company logo/branding (only Foxit eSign Pro and Foxit eSign Enterprise subscribers), and create notification templates.
Tip: Company Name and date format are important as these settings will be used in all the email communications and reusable templates/documents.
Field |
Description |
Account Settings Navigation: Settings > Account Settings |
|
Account Users Navigation: Settings > Account Users Super-admin can see all the documents for any account user and create users, assign roles and manager hierarchy. |
When managing users in a company, the administrator will be switched to Foxit Admin Console to perform user management and license management. For details, please refer to Foxit Admin Console User Manual. Super Administrator Role: In addition to all the document, template and eSignature functions, the Super admin can setup a reporting hierarchy (assign managers to users) while editing users. Those higher up in the hierarchy can view their subordinate’s documents and progress. Super admin can perform any function in the account. Regular users can simply create reusable templates, document and obtain eSignatures. |
Address Book Navigation: Settings > Address Book Create address book to add frequent users you send the contract to. |
Address book contains the frequent users. You can download the Excel template and bulk upload the account users. If you are a Foxit eSign Enterprise customer, the email group functionality is available to you. You can create email group name and bulk assign/upload email address to the email group. Email groups can be setup under: Navigation: Settings > Email Groups |
Notification Templates Navigation: Settings > Notification Templates |
You can also create a new template by clicking on ‘Create New’ under All Invitation Email Template. Add email template name, description, email subject, email body. You can use pre-defined fields in the template header and body. Select ‘Mark this template as default‘ to make the new template you create as your default template. |
Signed Documents Storage
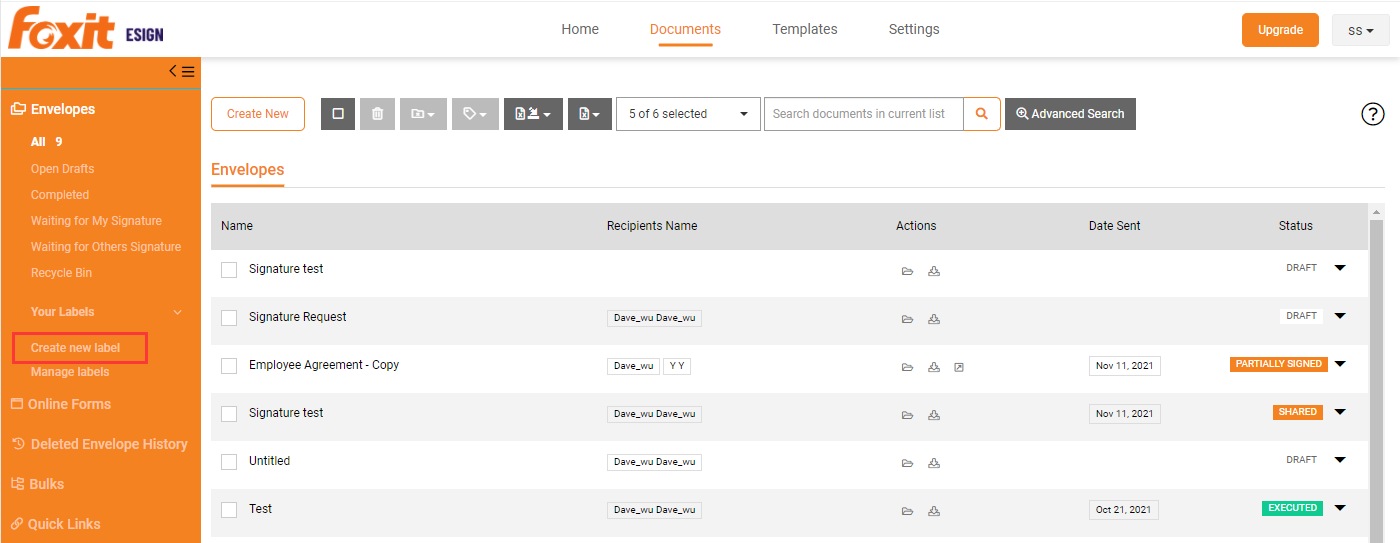
- Once the documents are signed (executed), you can create labels, select the document and assign document to labels/folders within Foxit eSign.
Screenshots below show the process:


- Alternately you can transfer your signed documents/contracts to the cloud such as Dropbox and Google Drive (Optional). Open any signed (executed) document and select click on the appropriate icon to upload to Dropbox or Google drive.