Open a PDF File
Please choose one of the following to open a PDF file with Foxit PDF Reader:
- Launch Foxit PDF Reader, then drag and drop the PDF file in the Foxit PDF Reader workspace.
- Right-click the PDF file, and choose Open With > Foxit PDF Reader.
- (Available in Foxit PDF Reader Website Edition only) If you have set Foxit PDF Reader as the default PDF reader, you can double-click the PDF file directly to open it with Foxit PDF Reader.
- Click the Open button
 on the Quick Access toolbar, or choose File in the menu bar > Open. In the Open dialog box, select the PDF file, and click Open.
 - Choose File in the Ribbon > Open, and do any of the following:
- To open a recently-opened PDF file, click Recent Documents > select the PDF file from the Recent Documents list.
- To open a PDF file from your local device, click Computer > Browse > select the PDF file > click Open.
- To open a PDF file in your ECM system (Microsoft SharePoint) or cloud services (Google Drive, OneDrive, Dropbox, and box), click Add a place, and choose Add under the ECM group or cloud service that you want to connect to. For more information, please refer to “Share PDF Files”.
- (Available in Foxit PDF Reader Website Edition only) Click the Start tab, and click any file in the Recent Files list (if any) to open a recently opened file, or click Open File to open a file from your local device.
Save a PDF File
By default, Foxit PDF Reader saves the changes to a file every 5 minutes automatically in case of system crash or power failure. If the application closes abnormally before you can save changes to a file, Foxit PDF Reader opens the recovery file automatically the next time you open it. The recovery file contains your changes up until the last time Foxit PDF Reader saved the document. You can change the time interval settings in Preferences > Documents > Save Setting > Automatically save file every x minutes.
After editing your PDF file, choose File > Save (or click the Save button ![]() in the Quick Access Toolbar) to save and replace the original file. You can also choose File > Save As to save the PDF file as a copy in your local disks, ECM servers, or cloud servers.
in the Quick Access Toolbar) to save and replace the original file. You can also choose File > Save As to save the PDF file as a copy in your local disks, ECM servers, or cloud servers.
View PDF Properties
To view the PDF properties, please navigate to File > Properties. You can acquire all relevant information as follows:
- Description: This tab shows some basic information about the document.
- Custom: View the custom properties of the PDF file, which may include metadata, company information, and other document properties.
- Security: This tab describes security permissions and what functionality is allowed within a PDF.
- Advanced: This tab lists the items of Print Dialog Presets for the document, which will be applied automatically when you print the PDF file with Foxit PDF Reader.
Smooth Text and Line Art
While rendering PDF files, Foxit PDF Reader automatically smooths the jagged edges of text and line art (including path and shading objects) to improve their appearance and readability. To change the default settings, please go to File in the Ribbon (or Foxit PDF Reader in the menu bar) > Preferences > Page Display, and modify the following options in the Rendering group.
- Smooth text: Optimally adjust text display that best suits your monitor. The “For Laptop/LCD Screens” option is selected by default. For legacy monitors, please choose Monitor instead. To turn off the smooth text rendering, please choose None.
- Smooth line art: Remove the abrupt angles in lines to make them smoother. Uncheck the option to turn off the feature.
Read PDF Files in Multiple Instances (Available in Foxit PDF Reader Website Edition only)
By default, Foxit PDF Reader displays multiple PDF files in different tabs in a single instance. However, you can enable multiple instances mode to view PDF files in multiple instances when double-click to open PDF files, which is ideal for reading PDF side by side.
To enable multiple instances mode, choose File in the Ribbon (or Foxit PDF Reader in the menu bar) > Preferences > Documents, check the Allow multiple instances option in Open Setting group, and click OK to apply the setting. While in multiple instances mode, you can revert to single instance mode by redoing the steps and unchecking the Allow multiple instances option.
Adjust PDF Views
Change the Page Display Mode
To change the page display mode, click View in the Ribbon (or choose View in the menu bar > Page Display), and choose any of the following options:
- Single Page
 : Display one page at a time.
 - Continuous
 : Display the pages in a continuous vertical column.
 - Facing
 : Display two pages side by side at a time.
 - Continuous Facing
 : Display facing pages side by side in a continuous vertical column.
 - Separate Cover Page
 : Display the cover page separately. This option is only available when you select Facing or Continuous Facing mode.
Read a PDF in Full Screen Mode
In Full Screen mode, Foxit PDF Reader Document Pane fills the entire screen, with Menu Bar and Navigation pane hidden behind. The mouse pointer remains active in Full Screen mode so that you can click links.
Set Full Screen Preferences
Before reading a PDF file in Full Screen mode, you can set the Full Screen preferences which include appearances, transitions, and panels that can be shown in the Full Screen mode.
- Choose File in the Ribbon (or Foxit PDF Reader in the menu bar) > Preferences to open the Preferences dialog box.
- Choose Full Screen in the Preferences dialog box, and then do the following:
- In the Full Screen Navigation group, you can specify how to navigate through PDF files in Full Screen Mode.
- Specify whether to show the scroll bar, tab bar, navigation panels, exit button or not in Full Screen mode by checking or unchecking the corresponding option in the Full Screen Navigation group.
- By default, Foxit PDF Reader will display a single page at a time in Full Screen mode. To display pages continuously in Full Screen mode, uncheck the One page at a time option.
- Usually, you can page through a PDF document in Full Screen mode by scrolling the mouse wheel, or pressing Space, Shift + Space or the arrow keys. You can check the Left click to go forward one page; right click to go back one page option to move to the previous or next page by left-clicking or right-clicking anywhere on the document pane.
Tip: If you need to use the context menu (for example, to adjust the page views) in Full Screen mode, please keep the Left click to go forward one page; right click to go back one page option unchecked.
- If you scroll a PDF document automatically in Full Screen mode, automatic scrolling stops when the last page is fully displayed. If you need to return to the first page and page through a PDF file continuously, check the Loop after last page option.
- To specify the frequency to automatically advance from page to page in Full Screen mode, please check the Advance every _ seconds option, and input a number (any integer between 1 and 99999). With this setting enabled, you can still page through a document manually using your mouse or keyboard shortcuts.
- In the Full Screen Appearance group, click the color palette to choose the background color in Full Screen mode.
- In the Full Screen Transitions group, choose a default transition and its direction from the drop-down list. If you need to control the page transition based on your navigation direction, check the Navigation control direction option. To ignore all transitions, check the Ignore all transitions option.
- In the Full Screen Navigation group, you can specify how to navigate through PDF files in Full Screen Mode.
- Click OK in the Preferences dialog box to apply the settings.
Enter and Exit Full Screen Mode
- To enter Full Screen mode, choose View in the menu bar > Full Screen, or click the Full Screen Mode button
 in the status bar.
 - To exit Full Screen mode, click the Exit Full Screen Mode button
 on the top right corner, or press the Esc key.
Tip: By default, Foxit PDF Reader will display a prompt message for you to confirm the operation when you open a PDF file that has been defined to be opened in Full Screen mode as the initial view. To change the default setting, please go to File in the Ribbon (or Foxit PDF Reader in the menu bar) > Preferences > Documents, and uncheck the Alert user when documents request Full Screen option in the Open Setting group.
Resize the Page View
Quick Zoom
To quickly zoom in or out on a PDF page, do any of the following:
- Pinch with two finger with Mac trackpad.
- In the Status bar, click the Minus sign
 or Plus sign
  , or drag the slider.
 - Press Control, and scroll the mouse wheel.
- Go to File in the Ribbon (or Foxit PDF Reader in the menu bar) > Preferences > General, and check Make Hand Tool use mouse-wheel zooming in the Basic Tools group. Then you can directly scroll the mouse wheel to zoom in or out on a PDF page in the Hand mode. This method is useful for users to browse large drawings.
Resize the Page View with Zoom Tools
To adjust the page at a specified size or make it to fit the document or window, do the following:
- Access the Zoom tools by any of the following ways:
- Choose View in the menu bar > Zoom.
- Click any tab (except File or Help) in the Ribbon, and choose Zoom or Fit Width/Fit Page/Fit Visible/Actual Size.
- Right-click on the document pane, and find the options in the context menu.
- Click the [Percentage] button (like
 ) in the Status bar, and find the options in the list.
- Choose any of the options to resize the page view:
- Zoom Out: Zoom out of the page.
- Zoom In: Zoom in the page for a clearer view.
- Zoom To: Resize the page to a specific zoom level or make the page fit the window.
- Actual Size: Display the page in its actual size.
- Fit Page: Resize the page to fit entirely in the document pane.
- Fit Width: Resize the page to fit the width of the window. Part of the page may be out of view.
- Fit Visible: Resize the page to make the text and images fit the visible width of the window, removing the margins.
- [Percentage](e.g. 150%): Resize the page at the specified zoom level.
Change the Page Magnification with Magnifier, Loupe, or Marquee Command
Magnifier Command
With the Magnifier command, you can magnify part of the page by using a magnifying glass.
- Choose View in the Ribbon > Magnifier.
- Move the Magnifier to the places you want to view.
- To switch between Magnifier and Fisheye Magnifier, press the left mouse button.
- To change the size of the magnifier window, press the right mouse button.
- To turn off the Magnifier, press the Esc key.
Loupe Command
The Loupe command allows you to view part of the page in a separate window with the specified zoom level.
- Choose View in the Ribbon > Loupe.
- Do one of the following to get a closer view:
- Move the Loupe command to the places you want to view, you will see the amplificatory or decreased objects in the Loupe Tool dialog box.
- Check the Lock option in the Loupe Tool dialog box, and you will find a red rectangle in the document, corresponding to the area shown in the Loupe Tool dialog box. You can drag or resize the rectangle to change the Loupe command view.
- By default, the Loupe command magnifies the page by 200%. You can do any of the following to change the magnification level in the Loupe Tool dialog box.
- Enter a value in the zoom text box, or choose a preset ratio from the drop-down list of the zoom text box.
- Click the minus or plus icon.
- Drag the slider.
- To turn off the Loupe, click the Close icon in the Loupe Tool dialog box, or press the Esc key.
Marquee Command
The Marquee command helps you expand the selected area of the page to fill the entire view or increase the magnification of the clicked area by one preset level (centering on the point where you clicked).
- Choose View in the Ribbon > Marquee.
- To increase the magnification, drag a rectangle to select the area or just click on the page.
- To decrease the magnification, press the Command key, and drag a rectangle to select the area or just click on the page.
- To turn off the Marquee, press the Esc key.
Reverse View
To read documents in a backward order, please choose View in the Ribbon > Reverse View.
Rotate the Page View
Do one of the following to rotate the view of the document pages:
- Go to View > Rotate View > Rotate Right or Rotate Left.
- Right-click the document, and choose Rotate Right or Rotate Left.
- Move two fingers around each other with Mac trackpad.
Note: Foxit PDF Reader allows you to rotate pages in 90-degree increments. Pages are rotated for viewing purposes only, and no changes to page orientation will be saved to the PDF file.
Change the Page Background Color
Do one of the following to change the page background color:
1. From the Preferences
- Choose File in the Ribbon (or Foxit PDF Reader in the menu bar) > Preferences to open the Preferences dialog box.
- Select General in the Preferences dialog box.
- In the Document Color Options group, the Replace document colors option is checked by default. If this option is not checked, please check it first.
- Click the color pane beside the Page background or Document text option.
- In the pop-up Colors window, select or customize a color, and click OK.
- Click OK in the Preferences dialog box to apply the color.
2. From the document pane
- Go to File in the Ribbon (or Foxit PDF Reader in the menu bar) > Preferences > General to make sure that the Replace document colors option is checked.
- Click View in the Ribbon.
- Click Change Color, and select a color from the preset list.
Display Rulers, Guides, Grids, and Line Weights
Rulers and Guides
Foxit PDF Reader provides horizontal and vertical ruler guides to help you align and position text, graphics, or other objects on the page. They can also be used to check the size and margins of your documents.
Show or Hide Rulers and Guides
To show or hide rulers and guides in the current PDF file, please do any of the following:
- Choose View in the menu bar > Rulers & Grids, and select or unselect Rulers/Guides.
- Choose View in the Ribbon, and check or uncheck Rulers/Guides in the View toolbar.
- Right-click anywhere on the document pane, and select or unselect Rulers/Guides in the context menu.
- To show or hide rulers, you can also press the shortcut key Option + Command + R.
- When rulers are displayed, you can right-click the rulers, and select or unselect Show Guides to show or hide guides. Right-clicking rulers and selecting Hide Rulers can hide rulers as well.
Create Ruler Guides
- Follow the step in “Show or Hide Rulers and Guides” to show rulers first.
- (Optional) The unit for ruler guides is set as inch by default. Please right-click on the rulers or choose File in the Ribbon (or Foxit PDF Reader in the menu bar) > Preferences > Measuring to change the unit, if necessary.
- Do one of the following:
- Drag down the horizontal ruler to create a horizontal guide, or drag to the right of the vertical ruler to create a vertical guide.
- Double-click a location on the horizontal ruler to create a vertical guide, or double-click a location on the vertical ruler to create a horizontal guide.
Move Ruler Guides
To move ruler guides, select the Hand command, click and hold the guide, and then drag it to a new location.
Delete Ruler Guides
To delete ruler guides, please do one of the following:
- To delete a guide, click the guide to select it, and then press the Delete key.
- To delete all guides on a certain page, scroll to the page, right-click the ruler area, and choose Clear Guides on Page.
- To delete all guides, right-click in the ruler area, and choose Clear All Guides.
Transparency Grid
Transparency grid is used to visualize transparent areas by displaying a checkerboard grid behind transparent objects. To show or hide the transparency grid, please go to File in the Ribbon (or Foxit PDF Reader in the menu bar) > Preferences > Page Display, and check or uncheck Display transparency grid in the Page Content group.
Line Weights View
In Line Weights View, the lines will be displayed with the weights defined in the PDF file. When Line Weights View is turned off, the lines will be displayed with the constant stroke width (1 pixel), regardless of zoom. Foxit PDF Reader will display PDF files in Line Weights view by default. To turn on or off Line Weights view while reading PDF files, please do any of the following:
- Click View in the Ribbon, and then check or uncheck the Line Weights option in the View toolbar.
- Press the shortcut key Control + Command + 5.
View PDF/A Files
By default, Foxit PDF Reader will open PDF/A-compliant documents in PDF/A mode (i.e. read-only mode) to prevent modification. When you open a PDF/A-compliant document, a notification message will be displayed. To work with PDF/A files, do the following:
- To turn off PDF/A mode and edit the document, click Enable Editing on the notification message. This operation will affect the settings in PDF/A view mode preference. To set the preference about PDF/A view mode, go to File in the Ribbon (or Foxit PDF Reader in the menu bar) > Preferences > Documents, and select the desired option from the drop-down list in PDF/A View mode group.
- To keep reading in PDF/A mode, click Disable Editing on the notification message.
- If you do not want to see the notification message the next time you open PDF/A files, check the Don’t show again option. To redisplay the notification message, please go to File in the Ribbon (or Foxit PDF Reader in the menu bar) > Preferences > General, and check the Show PDF/A message again option in the Notification Messages group.
View PDF Portfolios
PDF portfolios are a combination of files with different formats such as Microsoft Office files, text documents and image files.
To view a PDF portfolio, please do the following:
- You can open a PDF portfolio in the same way as you open a PDF file. Please refer to “Open a PDF File” for more information.
- By default, files in a PDF portfolio are displayed in the Layout view, with the preview of the selected file displayed in the right pane. Follow the steps below to change the view mode, if necessary.
- Click Detail in the Portfolio tab to display the details of files in a PDF portfolio. In the Detail view mode, you can right-click on any file or blank area and select View to specify which properties you would like to display in the file details list. Click a column name to sort files by certain property in an ascending or descending order.
- Click Cover Sheet in the Portfolio tab to display the cover sheet of the PDF portfolio.
- Click Preview Pane in the Portfolio tab, and choose Right or Bottom to display the preview pane at the right or bottom of the document pane respectively. Choose Off from the Preview Pane drop-down list to hide the preview pane.
- Click Default View in the Portfolio tab, and choose an option from the drop-down list to specify the default view for the currently opened PDF portfolio. The default view setting will take effect the next time you open the PDF portfolio.
- To open and read a file in the portfolio, do any of the following in the Layout or Detail view mode.
- Double-click a file.
- Select a file and click the Open button
 in the upper right corner of the document area.
 - Right-click a file and choose Open File in Native Application.
Tip: Files in a PDF portfolio will be opened in its native application if you have installed the native application on your device with macOS 10.14 or higher.
- To view the properties of a document in a PDF portfolio, do any of the following in the Layout or Detail view mode.
- Right-click a file in the portfolio, and choose Show Information from the context menu.
- Select a file in the portfolio, and click the Properties button
 in the upper right corner of the document area.
Search & Index in PDFs
Find Text in the Current PDF
Use the Find tool to search and find text.
- Input text in the search box.
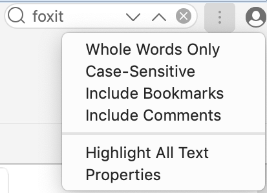
- Click
 to set the search criteria.
- Whole Words Only: Limit the search to match only whole words.
- Case-Sensitive: Make the search case sensitive.
- Include Bookmarks: Enable you to search for a word in the whole text, including bookmarks.
- Include Comments: Enable you to search for a word in the whole text, including comments.
- Highlight All Text: Highlight all the text search results in the document.
- Properties: Enable you to specify the color and opacity of the highlighting of the search results.
- Press Enter to search the text in the currently opened PDF file.
- Click
 or
or  to jump to the previous or next search result.
Advanced Search
Foxit PDF Reader supports the advanced search function, which enables you to do the following: search a string in a single PDF file, multiple PDF files under a specified folder, PDFs in a PDF portfolio, or a PDF index. When the search finishes, all occurrences will be listed in a tree view. This will allow you to quickly preview the context and jump to specific locations. You can also save the search results as a CSV or PDF file for further reference.
Before doing an advanced search, you can go to File in the Ribbon (or Foxit PDF Reader in the menu bar) > Preferences > Search to specify search preferences.
Search for Text and Patterns
- Click the Advanced Search command
 next to Find box, and choose Advanced Search.
 - From the Where would you like to search dropdown list, check one of the following to define the search field.
- To search the text in the current PDF document, select “In the current PDF document”. This option is not available if no document is open.
- To search the text in all PDF documents in a specific folder or disk, select All PDF Documents in > choose one of the disks or user-selected search paths. Foxit PDF Reader will show the path of the currently opened document for easier location.
- To search the text in selected documents in PDF portfolio, please select Selected PDFs in portfolio. This option is only available when a PDF portfolio is opened in the current session.
- To search text in the PDF portfolio, please select All PDFs in portfolio. This option is only available when a PDF portfolio is opened in the current session.
- To search PDF indexes, please choose Select Index. This option helps you search the index of the entire set of documents quickly if your PDF document or document collections include a full-text index. If you have added indexes in Foxit PDF Reader before, you can also choose Currently Selected Indexes option directly to search your currently selected indexes. For more information, please refer to “Search PDF indexes”.
- Select one of the following search criteria from the dropdown list under the file location box:
- Match exact word or phrase: Search for instances that match the entire word or phrase (including the spaces) you specified in the text search box.
- Match any of the words: Search for any instances that match at least one of the words.
- Looks like search pattern: Search for patterns like phone number, social security number, or email address in the PDF file. This option is not available when you search PDF indexes.
- Match All of the words: Search for any instances that match at least one of the words, but not necessarily in the order you type the words. If the document does not contain all of the words you type, no matched results will be found. This option is available only for searching a full-text PDF index.
- For text search, input the word you would like to search in “What word or phrase would you like to search for” box. For pattern search, select the pattern you want to search from the Select your pattern dropdown list, and choose the specific county and region from the Country/Region dropdown list.
- (Optional) Check any of the following options to specify the additional search criteria, if needed.
- To limit the search to match only whole words, check Whole Words Only. For example, if you search for the word Read, the word Reader will not be found. This criterion is only available for text search.
- To make the search case-sensitive, check Case-Sensitive. For example, if you search for the word text, the words Text and TEXT will not be found. This criterion is only available for text search.
- To search words in comments, please check Include Comments.
- To search words in bookmarks, please check Include Bookmarks. This criterion is only available for text search.
- To search words in attachments, please check Include Attachments.
- To search for two or more words that are separated by no more than a specified number of words specified in the Search preferences, please check Proximity. This option is available in index search when Match of All of the words is selected.
- To find instances that contain the stem of the specified search word, please check Stemming. For example, if you search for “opening” with Stemming option checked, instances of “open”, “opened”, “opens”, and “opening” will be found. This criterion applies to text search and index search, and is not available if either Whole Words Only or Case-Sensitive is selected.
- To highlight all the text search results, please check Highlight All Text.
- To limit search in order to match criteria such as document properties and metadata, check the option in Use these additional criteria group, and specify the additional criteria, including Author, Date Created, Subject, etc. These options are only available when you execute advanced text search in multiple PDF files.
Tip: The additional search criteria options are collapsed by default. You can click More to show all the options. To keep expanding and displaying the additional search criteria options all the time, please go to File in the Ribbon (or Foxit PDF Reader in the menu bar) > Preferences > Search, and check the Always show more options in advanced search option in the Search group.
- Click Search button.
- Each item listed includes a few words of context and an icon that indicates the type of occurrence. Check the search results with the following steps:
- If necessary, click the plus sign (+) to expand the search results.
- (Optional) For advanced search in multiple documents or portfolios, you can select an option from the Sort By drop-down list near the bottom of the Advanced Search panel to sort the search results by date modified, filename, or location.
- To collapse the file path and have a quick view about the file name, check Collapse File Path option at the bottom of the Advanced Search panel.
- Click a search result directly to view it in the PDF file.
- (Optional) Click the Save button
 in the Advanced Search panel, and choose Save results to PDF or Save results to CSV to save the search results.
 - (Optional) Click New Search button to start a new search task.
Note: For each search, layers, form fields, and digital signatures in the document will also be searched automatically. If some of the search results occurs on a hidden layer, when selecting the results in the Advanced Search panel you will be prompted whether to make that layer visible.
Search and Highlight
After searching, users may need to mark up the searched text strings in a highlight color. With Foxit PDF Reader’s Search & Highlight feature, users can perform an advanced search and highlight the searched text strings quickly.
- Do any of the following to open the Search & Highlight panel:
- Choose Comment in the Ribbon > Search & Highlight.
- Click the Advanced Search command
 next to Find box, and choose Search & Highlight.
- Search the text strings or search by patterns as needed.
- After the search completes, you can see a Highlight icon
 next to the Save button
  in the Search & Highlight panel, a check box in front of each searched instance and each file path, and the Check All option above the New Search button.
 - Select the check box of the instance you want to highlight and click the Highlight icon
 . (Tip: Click the check box in front of a file path to select all instances found in the file; select the Check All option to select all instances found in the search.)
 - (Optional) you can also change the highlight color as needed. Change the color from the appearance properties of the markup and set the properties as default. (For details, please refer to Change the Appearance of Comments.) Then perform a new search to apply the new color to searched results.
Search PDF Indexes
If your PDF document or document collections include a full-text index created by Foxit PDF Editor (for Mac and Windows), you can improve your search efficiency by simply searching the index for target words rather than each document separately. Steps are as follows:
- Click the Advanced Search command
 next to Find box and choose Advanced Search to open the Advanced Search panel.
 - From the Where would you like to search dropdown list, choose Select Index to add indexes.
- In the pop-up Index selection dialog box, click
 to add an index. All the indexes you added will be displayed in the index list in Index selection dialog box. You can select an index, and click
  to get its file information, or click
  to remove it from the list, if necessary. Once added, the index files will be marked as checked for you to execute index search by default. Before application, review the indexes in the list, and uncheck the unnecessary one. Upon completion, click OK to close the Index selection dialog box.
 - When you have successfully added the indexes, the Currently Selected Indexes option will be selected by default. If you want to search the currently selected indexes next time, you can also choose this option from the Where would you like to search dropdown list directly.
- Follow the steps in “Search for Text and Patterns” to proceed with your search.
Tip: An index created by Foxit PDF Editor for document collections usually includes an XML file, log file, and support folder. To ensure successful search, all the index files should be available when you search an index in Foxit PDF Reader.
Take a Snapshot of Selected PDF Contents
Use the Snapshot tool to take a snapshot of selected PDF contents and paste it in other applications.
- Click Home > Snapshot;
- Drag across the area that you want to copy; or right-click on the document and choose Select All to select all of the contents;
- (For copying selected area) You will be prompted that the selected area has been copied to the clipboard, click OK in the dialog box;
- Paste the selected image to other application(s) as desired.
Navigate PDF Files
Scroll Pages Automatically
- To enter the automatic scrolling mode, choose View in the Ribbon > AutoScroll, or press the shortcut key Shift + Command + H.
- Do the following to control the automatic scrolling:
- To increase or decrease the scrolling speed, press the Up Arrow or Down Arrow key, depending on the direction of scrolling. To change the scrolling speed to a preset level, press a number key (9 for the fastest, 0 for the slowest).
Tip: When the automatic scrolling reaches the slowest speed, pressing the Up/Down Arrow key will scroll up or down pages respectively. - To reverse the direction of scrolling, press the minus sign (-) key.
- To jump to the next or previous page, press the Right Arrow key or Left Arrow key respectively.
- To pause or continue automatic scrolling, press the Space key.
- To stop automatic scrolling, click AutoScroll in the View toolbar, or press the Esc key or shortcut key Shift + Command + H.
- To increase or decrease the scrolling speed, press the Up Arrow or Down Arrow key, depending on the direction of scrolling. To change the scrolling speed to a preset level, press a number key (9 for the fastest, 0 for the slowest).
Tip: To scroll through pages continuously, Foxit PDF Reader will automatically change the page display mode to Continuous (if it is in Single Page view) or Continuous Facing (if it is in Facing mode) when you enter into the automatic scrolling mode. After exiting the automatic scrolling, you can change the page display mode from the View menu or toolbar. For more information, please refer to “Change the Page Display Mode”.
Jump to a Specific Page
Use the page navigation tools on the status bar at the bottom to jump to a specific page easily.

 Page indicator: Shows the current page and the total number of pages of the opened PDF file. To jump to the page specified, you can input the page number and press Enter, or click the Down arrow
 ![]() and select a page number from the list.
and select a page number from the list.
 Previous Page: Jump to the previous page.
 Next Page: Jump to the next page.
Tip: If a bookmark is too long to be displayed in the Bookmarks panel, you can right-click the bookmark (or click the Options menu ![]() at the top of the Bookmarks panel) and select Wrap Long Bookmarks to wrap it to multiple lines for a better view. To unwrap, deselect Wrap Long Bookmarks.
at the top of the Bookmarks panel) and select Wrap Long Bookmarks to wrap it to multiple lines for a better view. To unwrap, deselect Wrap Long Bookmarks.
Jump to the Previous View or Next View
Do one of the following to go to the preview view or next view:
- Click the Previous View button
 or Next View button
 on the status bar at the bottom.
 - Click View in the menu bar > Go to > Previous View or Next View.
Jump to a Specific Chapter by Bookmark
- Do any of the following to open the Bookmarks panel:
- Click View in the menu bar > Navigation Panels >Bookmarks.
- Click the Bookmarks button
 in the Navigation panel.
 - Press the shortcut key Option + Command + 1.
- Click the bookmark to jump to the specific chapter.
Tip: If a bookmark is too long to be displayed in the Bookmarks panel, you can right-click the bookmark (or click the Options menu  at the top of the Bookmarks panel) and select Wrap Long Bookmarks to wrap it to multiple lines for a better view. To unwrap, deselect Wrap Long Bookmarks.
Jump to a Page by Thumbnail
- Do any of the following to open the Pages panel:
- Click View in the menu bar > Navigation Panels > Pages.
- Click the Pages button
 in the Navigation panel.
 - Press the shortcut key Option + Command + 2.
- Click the thumbnail to jump to the specific page.
Open a File Attachment
Open a file attachment embedded in a PDF file
- Do any of the following to open the Attachments panel:
- Click View in the menu bar > Navigation Panels > Attachments.
- Click the Attachments button
 in the Navigation panel.
 - Press the shortcut key Option + Command + 4.
- Double-click the file that you want to open with Foxit PDF Reader, or right-click the file and choose Open from the context menu.
- In the Open File Attachment dialog box, choose the option as desired, and click OK.
Open a file attachment pinned in the PDF file
The file attachment pinned in the PDF file is usually displayed with a pin icon. You can double-click the pin icon to open it with Foxit PDF Reader.
Word Count
Similar to Microsoft Word, Foxit PDF Reader counts words, characters, pages, lines and other information in all or part of your document. With no text selected, click View in the Ribbon > Word Count, and you will see a pop-up Word Count box for the statistics of the entire document. For a partial word count, just select the text you want to count, and then click View in the Ribbon > Word Count; or right click the selected text and choose Word Count from the context menu.