Install Foxit PDF Editor
System Requirements
Operating Systems
- macOS 10.15, macOS 11, macOS 12, macOS 13, or macOS 14
- Microsoft Office® 2016 or later version (required for some PDF creation features)
Recommended Minimum Hardware
- Intel Processor or Apple Silicon Processor
- 1 GB of RAM
- 5 GB of available hard disk space
- 1024*768 screen resolution
Install Foxit PDF Editor
To install Foxit PDF Editor that is downloaded from Foxit official website, please double-click the package, and then follow the step-by-step instructions in the Installation Wizard.
Uninstall Foxit PDF Editor
Choose one of the following options to uninstall Foxit PDF Editor:
- Open the Finder window > click on Applications in the sidebar > then right-click the Foxit PDF Editor icon > select Move to Trash;
- Drag and drop the Foxit PDF Editor icon to the trash can icon located in the dock;
- Open the Launchpad, and then drag and drop the Foxit PDF Editor icon into the trash can from that window.
Tip: If you activate Foxit PDF Editor by key code or key file and haven’t deactivate it before the uninstallation, a message will pop up to ask you whether to deactivate it when you uninstall the application. It is recommended to confirm the deactivation so that the license can be used on a different device.
Update Foxit PDF Editor
For the edition downloaded from Foxit official website, please update it by one of the following methods:
- Choose Help in the Ribbon > About Foxit PDF Editor > Check for Update to check and update Foxit PDF Editor to the latest version.
- Choose File in the Ribbon (or Foxit PDF Editor in the menu bar) > Preferences > Updater, and check the Automatically install updates option to update Foxit PDF Editor automatically whenever a newer version is available.
Purchase Foxit PDF Editor
To purchase Foxit PDF Editor (the edition downloaded from Foxit official website), please do one of the following:
- Order online: go to Foxit website to order directly.
- In Foxit PDF Editor, click the Shopping Cart icon
 or choose Help/Home in the Ribbon > Buy Now to purchase a license from Foxit online store.
Tip: Internet connection and Foxit account signed-in are required to use the full features for subscribed users.
Activate Foxit PDF Editor
After launching Foxit PDF Editor (the edition downloaded from Foxit official website), the activation wizard pops up. If you do not have a license, click Buy Now to purchase Foxit PDF Editor from the Foxit website. If you have already purchased a license for Foxit PDF Editor, click Activate in the activation wizard, and then input the code of the registration key to activate Foxit PDF Editor. (If you didn’t provide your name when purchasing the license, you’ll be prompted to type your name.) If the activation is successful, a message box will pop up. Click OK.
Note: If your PDF Editor is managed by Foxit Admin Console (a cloud-based portal that serves for administrators to manage Foxit products/services in an organization), there will be a prompt window to let you activate it for further use, depending on the activation mode defined by Admin Console. You need to contact your administrator for the activation. See also Foxit Admin Console.
Deactivate Foxit PDF Editor
You can deactivate Foxit PDF Editor on one machine in order to activate on another. To deactivate Foxit PDF Editor, click Help in the Ribbon > Deactivate.
Workspace
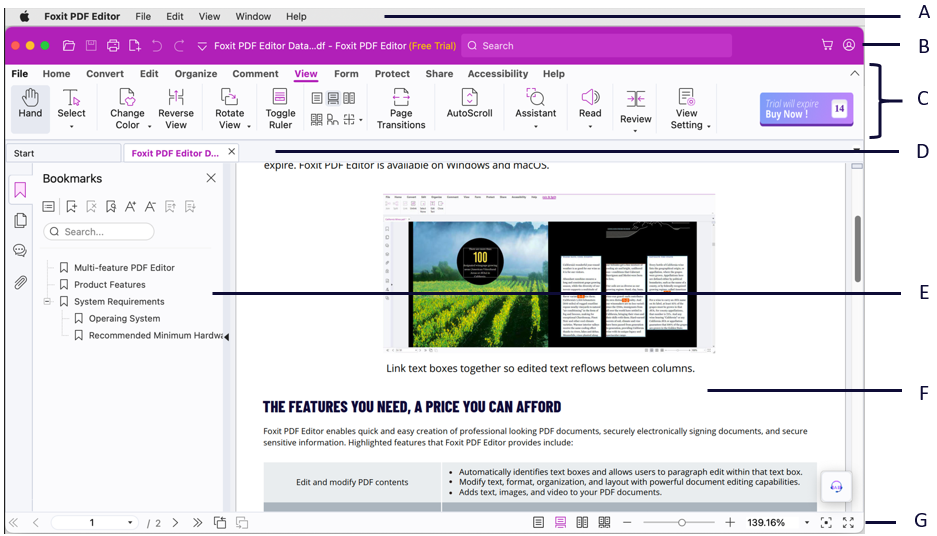
Foxit has integrated the collective commands in the ribbon interface and created a new way of working, namely Ribbon Mode. In this mode, commands are arranged by groups and tasks. While reading a PDF file, you can control-click the document name in the application’s title bar to navigate the filesystem trees.
- Apple Menu bar: Displays the standard menus of Foxit PDF Editor to help you quickly get started with the application.
- Title Bar: A horizontal bar at the top of the application window. It displays the Quick Access Toolbar, software title, current file name, search field, buttons to minimize/maximize/close the app, etc. The search field on Title Bar allows you to search commands or text based on the keywords you specified.
- Ribbon tabs and Commands: Shows the major tabs of Foxit PDF Editor, and categorizes the commands by groups according to the function under each ribbon tab. You can double-click on a tab name (or click the Collapse the Ribbon icon
 /Pin the Ribbon icon
  on the right corner of the Ribbon) to collapse or expand the tab. When a tab is collapsed, click on the tab name to show and hide its commands.
 - Tab bar: Display multiple PDF files in tabs. You can also click the Start tab to check Tool Wizard & Video Tutorials, or open PDF files in the Recent file list or from a local disk. For each file tab, Foxit PDF Editor provide options in the context menu for you to manage them conveniently, including closing tab(s), printing tab(s), copying the file path, and opening the file folder.
- Navigation Panel: Display Bookmarks panel, Pages panel, Attachments panel, Comments panel, and more, to help you work with the PDF file easily. While working with the navigation panel, you can right-click on its left border to find the options to switch to a specific panel, pin the currently opened panel so that it will be automatically expanded when you reopen the same document (if you have enabled the application to restore the last view settings when reopening PDFs in Preferences > History), or hide/show the navigation panel.
Tip: To hide or show the navigation panel, you can also press the shortcut key F4 or Fn + F4, click on anywhere along the right border of the navigation panel, or choose View in the menu bar (or View in the Ribbon > View Settings) > Navigation Panels > Hide/Show Navigation Panel. - Document Pane: Display the currently opened PDF file.
- Status bar: Shows the status information about the currently opened document.
Set the Skin
Foxit PDF Editor provides three options (Light, Dark, and Use system setting) that allow you to customize the look (skin) of the software. To change the skin, choose File in the Ribbon > Skin, and then select the desired option from the Select Mode drop-down list. Or choose View in the menu bar > Skin, and select Light/Dark/Use system setting from the drop-down list. If you choose Use system setting, the skin automatically switches to the Light or Dark mode according to the Appearance setting in your macOS system.
When you are in the Light Mode, you can also specify the theme color for your application. To do so, choose File in the Ribbon > Skin (or choose View in the menu bar > Skin > Colorful Theme), and select Light Gray or Colorful in the Select Light Mode Theme group to set the theme color to light gray or your desired color.
About the Start Page
By default, the Start page appears when you start Foxit PDF Editor and includes the list of recent documents opened, helpful product tutorials, and Tool Wizard for some most frequently used features to help you get started with Foxit PDF Editor.
The Start page will appear every time you launch the program unless you disable it by unchecking the Show Start page option at File in the Ribbon (or Foxit PDF Editor in the menu bar) > Preferences > General > Application Startup, or your administrator disables it using deployment tools across your organization. If the Start page is enabled but has been closed, you can reopen it by selecting View in the Ribbon > View Setting > Start Page.
Navigate and Manage Application Windows
Foxit PDF Editor provides you with a familiar and intuitive experience consistent with macOS standards to navigate and manage the application windows, ensuring a smooth and efficient workflow.
Click Window in the menu bar, and you will find the following options:
- Minimize: Minimize the current active window to the Dock. Pressing the Option key will change this item to Minimize All.
- Zoom: Toggle between a predefined size appropriate to the window’s content and the window size you have set. Pressing the Option key will change this item to Zoom All.
Tip: For quick access, you can also directly double-click on the title bar to zoom an active window.
- In the Window menu, you can also find a list of files you have opened. You can click the file name to switch to the corresponding window.
Hold the pointer over the green button (like  ) in the upper-left corner of an active window, and you will find the following options:
- Enter Full Screen: Maximize the window to fill the entire screen, with the menu bar hidden from view. To exit full screen, move your mouse over the top area of the screen to reveal the hidden menu bar, and click the green button
 (or hold your pointer over the green button and choose Exit Full Screen). When you press the Option key, this item will change to Zoom.
 - Tile Window to Left of Screen/Tile Window to Right of Screen: Fix the current active window to the left or right half of the screen and enter the Split View mode. In this mode, you can choose another window to fix to the opposite side for side-by-side display. When you press the Option key, these two items will be changed to Move Window to Left Side of Screen/Move Window to Right Side of Screen, which allows you to move the window to the left or right side of the screen.
Customize the Toolbar
The Ribbon is designed to help you find the commands in an easy and convenient way. Foxit PDF Editor gives you the capability to personalize and fine-tune the Ribbon in the way you want. With this feature, you can customize Quick Access Toolbar and the default Ribbon, and create custom tabs or groups with your favorite commands.
Customize Quick Access Toolbar
Quick Access Toolbar displays all your bookmarked commands. You can add commands that will let you view and search content easily to your Quick Access Toolbar. This is another way for you to arrange and manage all the commands.
Add Commands to Quick Access Toolbar
- Click
 on the Quick Access Toolbar, and select More Commands. Or right-click the ribbon area and choose Customize Quick Access Toolbar.
 - In the Customize Tools dialog box, choose the Quick Access Toolbar tab.
- Select the commands or separators you preferred to be shown on Quick Access Toolbar and add them to the Quick Access Toolbar list. Click Up or Down to arrange the command order and then click OK.
To return toolbars to default configuration, repeat the steps above to open the Quick Access Toolbar tab in the Customize Tools dialog box, choose Reset or press Option + S, and click OK to apply the setting.
Tip: You can also right-click a command on the ribbon and choose Add to Quick Access Toolbar to add the command to Quick Access Toolbar.
Show Quick Access Toolbar below/above the Ribbon
To show Quick Access Toolbar below/above the ribbon area, do any of the following:
- Click
 on Quick Access Toolbar, and select Show Below the Ribbon or Show Above the Ribbon.
 - Right-click the ribbon area and choose Show Quick Access Toolbar Below the Ribbon or Show Quick Access Toolbar Above the Ribbon.
- Open the Customize Tools dialog box. In the Quick Access Toolbar tab, select or unselect the Show Quick Access Toolbar below the Ribbon option, and click OK to apply the settings.
Customize the Ribbon
To customize the Ribbon, you can right click the Ribbon, choose Customize the Ribbon from the context menu to bring out the Customize Tools dialog box first, and then follow the steps below.
Create a New Tab
To create a new tab, please do one of the following:
- Select the tab after which you want to add the new tab, and then click New Tab.
- (Alternatively) Right-click the tab after which you want to add the new tab, and then choose New Tab from the context menu.
Add a New Group to a Tab
To add a new group to a tab, please do one of the following:
- Select the tab to which you want to add the group, and then click New Group.
- (Alternatively) Right-click the tab to which you want to add the group, and then choose New Group from the context menu.
Rename a Tab or Group
- Select the tab or group to be renamed, and click Rename.
- (Alternatively) Right-click the tab or group to be renamed, and choose Rename from the context menu.
- In the Rename dialog box, input the new name and click OK.
Add Commands to a Group
- Select the group under which you want to add a command.
- Choose the command category and the desired command from the Choose commands from list.
- Click Add to add the selected command to the desired group.
Remove a Tab, Group or Command
To remove a tab, group or command, please do one of the following:
- Select the tab, group or command to be removed, and click Remove.
- (Alternatively) Right-click the tab, group or command to be removed, and choose Delete from the context menu.
Reorder the Tabs or Groups
To reorder the tabs or groups, please do one of the following:
- Select the tab or group you want to reorder, then click the Up
 or Down
  arrow to move accordingly.
 - (Alternatively) Right-click the tab or group you want to reorder, and then select Move Item Up or Move Item Down to move accordingly.
Reset the Ribbon
- Click Reset in the Customize Tools dialog box to reset the Ribbon to the default settings.
Import a Customized Ribbon
- Click Import.
- In the Open dialog box, select the Ribbon customization file (.xml file), and click Open.
Note: After importing a Ribbon customization file, you will lose all the arrangements you have customized previously. If you want to revert to the customization you currently have, it is easier to export the customized Ribbon before importing any customization.
Export a customized Ribbon
- Click Export.
- In the Save As dialog box, specify the file name and path and click Save.
Notes:
- After customization, you need to click OK in the Customize Ribbon tab to save and apply your customizations to the Ribbon.
- To help you distinguish a default tab or group from the customized ones, the custom tabs or groups in the Customize the Ribbon list are tabbed with “(Custom)” after the name (like this:
 ), but the word “(Custom)” will not appear on the Ribbon.
 - The commands in the default group under a default tab are displayed in grey, and they cannot be renamed, reordered, or removed.
- You cannot remove default tabs in Foxit PDF Editor.
Search and Find Commands
The Search box on the title bar (sits at the top of the window) enables you to search commands or text based on the keywords you specified. To quickly find a command in the Ribbon, click in the Search box (or press Control + Q), and input the command name. Then from the drop-down menu, you can select the command from the Actions group to activate the desired feature. You can also find the commands that you have searched and used recently from the Recently Used group in the drop-down menu to re-activate the corresponding features with ease.
To locate a menu item, click Help in the menu bar and type the item name into the Search box. Foxit PDF Editor will show matching menu items in a list. Hover over an item in the list to highlight its location in the menus, or click it directly to use the feature.
Plug-in Management Platform
For flexible and convenient management of plugins, Foxit PDF Editor offers a Plug-in Management Platform, in which you can view the plug-in status, learn the information about the plugins installed, as well as manage the plug-ins as needed.
To open the Plug-in Management Platform, please choose Help in the Ribbon > Plug-in Management.
Plug-in Status
- Certified: Shows whether the signature of the plug-in is valid or not.
- Loaded: Shows whether the plug-in has been loaded successfully or not.
Note: Some plug-ins are not loaded immediately (i.e. in the standby status with shown in the Certified and Loaded columns). These plug-ins will be loaded and certified after you use the related features.
Plug-in Information
To learn the details of a plug-in, please click More under the general description of the plug-in in the About Plug-in Management window.
Plug-in Management
Within Plug-in Management Platform, you can manage the plug-ins as needed, including installing, enabling, disabling and uninstalling plug-ins.
Install a Plug-in (Only Available in the Edition Downloaded from Foxit Official Website)
Foxit PDF Editor allows you to install a plug-in in FZIP format. You can also install one or more plug-ins by using an XML file. An XML file defines the information about plug-ins to be installed, and should be used together with .dylib files.
- Select Help in the Ribbon > Plug-in Management to open the About Plug-in Managementdialog box.
- Click Install Plugins in the About Plug-in Management dialog box.
- In the pop-up dialog box, do one of the following:
- To install a plug-in in FZIP format, select FZIP Files (*.fzip) from the file type drop-down list, choose the file from your local disk, and click Open. And then follow the screen instructions to install the plug-in on your Mac device.
- To install one or more plug-ins by using an XML file, select Plug-in File (*.xml) from the file type drop-down list, choose the XML file from your local disk, and click Open. Then Foxit PDF Editor will verify whether the signature of the plug-in is valid or not. If it is valid, Foxit PDF Editor will load the plug-in. Otherwise, the installation will be terminated.
Tip: If you install plug-ins by using an XML file, please place the .xml file and .dylib files in the same folder to avoid an installation failure.
Disable a Plug-in
To disable a plug-in, please follow the steps below:
- Select Help in the Ribbon > Plug-in Management to open the About Plug-in Management dialog box.
- Select the plug-in you want to disable, and click the Disable button
 to disable it.
Enable a plug-in
To enable a plug-in, please follow the steps below:
- Select Help in the Ribbon > Plug-in Management to open the About Plug-in Management dialog box.
- Select the plug-in to be enabled, and click the Undo Disable button
 to enable it.
Uninstall a custom plug-in (Only Available in the Edition Downloaded from Foxit Official Website)
To uninstall a custom plug-in (not built by Foxit), please follow the steps below:
- Select Help in the Ribbon > Plug-in Management to open the About Plug-in Management dialog box.
- Select the plug-in to be uninstalled, and click the Uninstall button
 to uninstall it.
Notes:
- All the operations to the plug-ins will take effect after you restart Foxit PDF Editor.
- Foxit PDF Editor includes plug-ins that are necessary for the realization of its functionalities or are necessarily required for maintenance. To ensure normal operation, you are not allowed to disable or uninstall these plug-ins (such as Updater plugin, Plugin Platform plugin, etc.)
Get Help and Support
Foxit PDF Editor offers comprehensive support options to assist you in working with PDFs. Our support resources include a Help Center and an AI-powered Support Center, both of which are accessible within Foxit PDF Editor.
Help Center
To access the Help Center, please choose Help either in the Ribbon or in the menu bar. In the Help Center, you will find the following helpful resources:
- What’s New (available in the Help menu): Check the latest features and updates in the current version.
- User Manual: Access the user manual for detailed guidance on how to use Foxit PDF Editor.
- Online Tutorials: Visit Foxit website to check the online tutorials on how to use Foxit PDF Editor.
- About Foxit PDF Editor (available in the Help Ribbon): Check the version number and copyrighted materials used in Foxit PDF Editor.
- Keyboard Mapping (available in the Help menu): View and export the list of default keyboard shortcuts for commonly used functions.
- Set to Default PDF Reader (available in the Help Ribbon): Set Foxit PDF Editor as the default PDF viewer. This option is available in the edition downloaded from Foxit official website.
- Activate/Deactivate (available in the Help Ribbon): Activate or deactivate Foxit PDF Editor.
Support Center
Foxit PDF Editor offers an AI-powered customer support tool called Support Center, which acts as an AI chatbot and can provide personalized assistance based on your specific needs. Utilizing natural language processing and machine learning algorithms, the AI chatbot can understand user queries and respond with answers. It can assist you in using a specific function by providing step-by-step instructions based on Foxit resources, such as Foxit Knowledge Base. (Tip: The AI chatbot is enabled by default. If you want to disable the feature, choose File in the Ribbon (or Foxit PDF Editor in the menu bar) > Preferences > General > Application Startup, check Disable Support Center under Application Startup, and restart the application.)
To access AI chatbot, choose Support Center in the Help Ribbon or menu, or click ![]() on the lower right corner of the application window. Then, you can input your questions and interact with the AI chatbot in the Support Center panel displayed on the right side of the application window.
on the lower right corner of the application window. Then, you can input your questions and interact with the AI chatbot in the Support Center panel displayed on the right side of the application window.
In addition, you can also click the ![]() icon at the top of the Support Center panel and select Submit Ticket to send your bug reports/suggestions/comments.
icon at the top of the Support Center panel and select Submit Ticket to send your bug reports/suggestions/comments.