View and Edit PDF Properties
To view and modify the PDF properties, please navigate to File > Properties.
Description
This tab shows some basic information about the document. The person who created the document in the source application may have set the title, subject, author, and keywords. Click Custom, and the pop-up Custom Properties dialog box shows some document information (such as comments and the company name). You can easily edit the document information within the PDF document, a useful way for searching and indexing files.
You can also customize document properties by clicking Custom. In the pop-up Custom Properties dialog box, input the property name and the value, and then click Add to add a custom property. To change the value of a property, select it and update the value, and then click Change. To change the name of a custom property, you need to delete the property and create a new custom property. To delete a property, select it and click Delete.
Initial View
When a user opens your PDF document, they see the initial view of the PDF (if preset). You can set the initial view to the magnification level, page and page layout that you want.
Layout and Destination
- Navigation: Choose desired panels to be displayed in the navigation pane.
- Page Layout: Choose a page layout option to view the document. The default is Continuous.
- Magnification: Choose a zoom level that the document will appear at when opened. The default is the magnification set in the File tab (or Foxit PDF Editor in the menu bar) > Preferences > Page Display > Zoom level.
- Open to page: Specify the page that appears when you open the document.
Tip: If users specify the layout settings in the initial view and page display preferences, the settings in initial view will prevail.
Window Options
- Display document title: Show the document title in the title bar of the application window. You can view the document title in File > Properties > Description.
- Open in Full Screen mode: Open the document in Full Screen mode. The document pane fills the entire screen, with the toolbar and navigation pane hidden behind. For more information about reading PDFs in Full Screen mode, please refer to “Read a PDF in Full Screen Mode”. By default, Foxit PDF Editor will display a prompt message for you to confirm the operation when you open a PDF file that has been defined to be opened in Full Screen mode as the initial view. You can check Remember my choice for this document to skip the prompt message and apply your current operation when you reopen the same document. To change the default setting, please go to File in the Ribbon (or Foxit PDF Editor in the menu bar) > Preferences > Documents, and uncheck the Alert user when documents request Full Screen option in the Open Setting group.
- Center window on screen: Place the application window in the center of the screen area.
- Resize window to initial page: Adjust the application window size to the default magnification set in the File tab (or Foxit PDF Editor in the menu bar) > Preferences > Page Display > Zoom level.
User Interface Options
Choose options to hide parts of the interface as needed.
Security
This tab describes security permissions and what functionality is allowed within a PDF. You can change document security settings if the permission allows.
Fonts
The Fonts tab lists the fonts and the font types used in the original document, as well as the encoding used to display the original fonts.
Advanced
This tab lists the items of Print Dialog Presets for the document, which will be applied automatically when you print the PDF file with Foxit PDF Editor. The Reading Options group allows you to specify the reading direction and language that screen readers use to read the PDF document.
Page Scaling: Choose Default to scale the page with the application default setting when printing, which is Fit to printer margins. Or choose None to preserve the scale in the documents. To print with additional page scaling types as shown in the Print dialog box, you need to choose one of them when printing.
DuplexMode: Choose Simplex to print on one side of the page. Or choose Duplex Flip Long/Short Edge to print a document double sided and flip pages on long/short edges.
Number of Copies: Choose the number of copies you want to print. Or choose Default to use the application default copies, which is one copy.
Pages: Specify the page range you want to print.
Paper Source by Page Size: Automatically select the paper type according to the page size of the PDFs when printing.
Binding: Choose a reading direction in which you read a document in Facing or Continuous Facing mode. Choose Left Edge to read from left to right, or choose Right Edge to read from right to left.
Language: Specify the document language that screen readers use to read the document.
Manage Bookmarks
Bookmarks are navigation tools that make your PDF files easier to read. With Foxit PDF Editor, you can easily add, edit, or delete bookmarks in a PDF file if the security settings allow.
Open the Bookmark Panel
- Do any of the following to open the Bookmarks panel:
- Choose View in the menu bar > Navigation Panels > Bookmarks.
- Click the Bookmarks button
 in the Navigation panel.
- In the Bookmarks panel, you can click the Expand or Collapse button
 to expand or collapse all bookmarks.
Add a Bookmark
- (Optional) If you want to add a bookmark in a bookmark list for a PDF file that contains bookmarks, select the bookmark after which you want to place the new bookmark.
- In the document page, do the following:
- To save the current view as a bookmark, navigate to the page and location where you want the bookmark to link to.
- To save the selected text as a bookmark, select text with the Select Text command or Hand command (if you have checked the Make Hand Tool select text option in Preferences > General).
- Do any of the following:
- (For selected text only) Click
 on the floating toolbar to save the selected text as a bookmark. By default, the selected text will be used as the bookmark name. You can follow the steps in “Rename a Bookmark” to rename it, if necessary.
 - Click the Add Bookmark button
 in the Bookmarks panel, and then input the name for the bookmark.
 - Click Edit in the Ribbon > Bookmark.
- (For selected text only) Click
Tip: After adding a bookmark, you can also move it to a desired hierarchy, if necessary. Please refer to Move a Bookmark for more information.
Edit a Bookmark
In Foxit PDF Editor, you are able to rename a bookmark, reset a bookmark's destination, or customize the text appearance of a bookmark with ease if the security settings allow.
Rename a Bookmark
- In the Bookmarks panel, double-click the bookmark you want to rename (or right-click the bookmark and choose Rename).
- Type the new name, and press Enter.
Reset a Bookmark's Destination
- In the document page, move to the location you want to specify as the new destination.
- In the Bookmarks panel, right-click the bookmark which you want to reset the destination, and choose Set Destination.
- Click Yes to confirm your operation.
Customize the Text Appearance of a Bookmark
- In the Bookmarks panel, right-click the bookmark, and choose Properties.
- In the Bookmark Properties dialog box, click the Appearance tab, and select the font style and color for the text.
- Upon completion, click Close to close the dialog box.
Tip: After defining a bookmark's appearance, you can set it as bookmarks' default property by right-clicking the bookmark and then selecting Use Current Appearance as New Default option.
Add an Action to a Bookmark
- In the Bookmarks panel, right-click the bookmark, and choose Properties.
- In the Bookmark Properties dialog box, click the Action tab.
- Choose an action from the Select Action menu and click Add, and then refer to the section of “Actions Tab”.
Delete a Bookmark
To delete a bookmark, please do one of the following in the Bookmarks panel:
- Select the bookmark you want to delete, and click the Delete Bookmark button
 at the top of the Bookmarks panel.
 - Right-click the bookmark you want to delete, and choose Delete.
- Select the bookmark you want to delete, and press the Delete key in your keyboard.
Tip: Deleting a bookmark deletes all the bookmarks that are subordinate to it.
Move a Bookmark
To move a bookmark, please do one of the following in the Bookmarks panel:
- Select the bookmark that you want to move, and drag it to the desired place.
- Right-click the bookmark that you want to move, and click Cut from the context menu. Then right-click the destination bookmark, and select one of the options:
- Paste under Selected Bookmark: Paste the bookmark as a child bookmark under the destination bookmark.
- Paste after Selected Bookmark: Paste the bookmark as a parent bookmark after the destination bookmark.
Create a Table of Contents from Bookmarks
To create a table of contents in a current PDF, please select New TOC from bookmarks from the Options menu ![]() on the Bookmarks panel. Select the bookmark levels you want converted in the Add a new content of table dialog box. The TOC page will be created from the bookmarks of the current PDF, displaying a hierarchy of headings and their corresponding page numbers in the PDF. Heading levels are based on the bookmark hierarchy, with the second and lower level headings indented. If you select Convert all bookmark levels into items in the table of contents, the entire hierarchy of bookmarks will be converted to the headings of TOC, but the tenth and lower level headings are not indented.
on the Bookmarks panel. Select the bookmark levels you want converted in the Add a new content of table dialog box. The TOC page will be created from the bookmarks of the current PDF, displaying a hierarchy of headings and their corresponding page numbers in the PDF. Heading levels are based on the bookmark hierarchy, with the second and lower level headings indented. If you select Convert all bookmark levels into items in the table of contents, the entire hierarchy of bookmarks will be converted to the headings of TOC, but the tenth and lower level headings are not indented.
Create and Manage Destinations
When creating a link in a PDF, you can link to a specified destination in the document. With Foxit PDF Editor, you can create and manage destinations in the Destinations panel in the navigation pane.
Open the Destinations Panel
Do any of the following to open the Destinations panel:
- Choose View in the menu bar > Navigation Panels > Destinations.
- Click the Destinations button
 in the Navigation panel.
Create a Destination
- Navigate to the location in the document you want to set as the destination.
- In the Destinations panel, click the Create new destination icon
 or choose the New Destination command from the Options menu
  .
. - Input the name for the destination, and save the document.
Manage Destinations
Sort Destinations
To sort destinations, click the Options menu  in the Destinations panel, and select Sort by Name or Sort by Page.
Change Destinations
- To move to the target location, double-click the destination. Or right-click the destination and choose Go to Destination.
- To reset the location of the destination, navigate to the desired location, right-click the destination and choose Set Destination.
- To rename a destination, select the destination, click on the name of destination and type a new name. Or right-click the destination and choose Rename.
Delete Destinations
To delete a destination, right-click a destination and choose Delete. Or choose the destination and press Delete on the keyboard.
Manage File Attachments
Open the Attachments Panel
Do any of the following to open the Attachments panel:
- Choose View in the menu bar > Navigation Panels > Attachments.
- Click the Attachments button
 in the Navigation panel.
Add a File Attachment
- Do any of the following:
- In the Attachments panel, click the Add Attachment button
 .
. - Choose Edit in the Ribbon > File Attachment.
- In the Attachments panel, click the Add Attachment button
- In the File Attachment dialog box, click Add Files, and select one of the following options:
- Add Files: Add one or more files. You can choose files from local drives or click Open from ECM to select files from ECM systems and cloud services.
- Add Folder: Choose a folder to add all the supported files in that folder.
- Click OK, and then the selected files will be added as attachments in the PDF document.
Work on the File Attachments
Configure Security Settings
You can configure the security settings about how to open a file attachment with the following steps:
- In the Attachments panel, click the Settings button
 .
. - In the Preferences dialog box, do any of the following:
- To add a new extension, click the Add button, input the file extension, and click OK.
- To delete an extension, select the existing extension in the list, and click Delete.
- To change the settings of how to open the attachment of a certain type, choose the desired option from the Strategy drop-down list.
- Click OK to apply the settings.
Manage File Attachments
In the Attachments panel, right-click a file attachment, and select one of the following options from the context menu:
- Open: Open the attachment in Foxit PDF Editor or other supported application installed in your local computer. Please note that how the file attachment will be opened depends on your security setting in the Preferences. And you can also double-click the file attachment in the Attachments panel to open it.
- Delete: Delete the selected attachment.
- Save Attachment: Save the selected attachment as copy in your local disk.
- Properties: Add a description for the selected file attachment.
Manage Page Thumbnails
Open the Pages Panel
Do any of the following to open the Pages panel:
- Choose View in the menu bar > Navigation Panels > Pages.
- Click the Pages button
 in the Navigation panel.
Work on Page Thumbnails
The Pages panel displays all the page thumbnails of a PDF file which is opened in Foxit PDF Editor. In the Pages panel, you can do any of the following:
- To resize the page thumbnails, click the Enlarge button
 or Reduce button
  , or right-click on a page thumbnail and select Enlarge Page Thumbnails or Reduce Page Thumbnails.
 - To change the visible area of the page in the document pane, click on a page thumbnail, and move the red rectangle.
- To print a selected page, right-click on a page thumbnail, and select Print Pages.
- To specify the tab order for a selected page, right-click on a page thumbnail, and select Properties. Then select an order as desired in the Tab Order tab.
- To add an action to a page, right-click on the page thumbnail, and select Properties. In the Page Properties dialog box, click the Actions tab, choose a trigger method and action from the Select Trigger and Select Action menu, and click Add. And then refer to the section of “Actions Tab”.
- To embed page thumbnails into the document, right-click on any page thumbnail, select Embed All Page Thumbnails, and confirm your operation. Embedding page thumbnails into the document makes them appear faster in the Pages panel, but increases the file size. If you want to remove the embedded page thumbnails from the document, right-click on any page thumbnail, select Remove Embedded Page Thumbnails, and confirm your operation.
Tip: When you are organizing pages, you can also right-click on any page thumbnail in the Thumbnail window, and choose the Print Pages or Properties or Embed All Page Thumbnails/Remove Embedded Page Thumbnails option from the context menu to print pages, change page properties or embed/unembed page thumbnails.
Work with Audio & Video
Play Audio or Video
To play audio or video, please make sure you have necessary media player installed on your device, and then do the following:
- Make sure that you have selected the Hand command.
- Click the play area of the audio or video.
Add Audio or Video
Foxit PDF Editor allows you to add audio and video in the popular formats (including .mov, .mpg, .mpeg, .mp4, .wav. .mp3, etc.) to PDF files.
Add Audio or Video
- Choose Edit in the Ribbon > Audio & Video.
- Press and hold mouse button down, drag to select an area on the page where you want the audio or video to appear.
- In the pop-up Add Audio & Video dialog box, you will see some options listed below:
- Location: Click the Browse button to select the movie file you want to insert.
- Content type: Specify the type of the media you insert. It is selected automatically. But you can also specify the clip type if you want. Please note that changing the Content Type setting may cause problems playing the media.
- Embed content in document: Include the media file into the PDF file. This option will increase the file size of the PDF. It is selected by default. If the check box is cleared, you will not be able to play it if you open this PDF file on other computers.
- Show Player: Specify whether or not to display the player when an audio or video is played. The player will allow you to stop, pause, or resume the media. This option is checked by default.
- Poster Settings: Choose whether to display an image in the play area when the movie isn’t playing. You can choose to use no poster, or create poster from file.
- Upon completion, click OK to add the audio or video.
Edit the Play Area
- To edit audio or video, firstly you need to make sure that you have chosen the Select Annotation command (choose Select > Select Annotation in any tab except for the File/Help/Accessibility tab) or Audio & Video command (choose Edit in the Ribbon > Audio & Video).
- Click the play area to select audio or video, and then do the following:
- To move the clip, drag the rectangle to a new location on the page.
- To resize the play area, drag any of the handles on the rectangle.
- To delete the clip, press the Delete key on your keyboard.
- Right-click the play area of audio or video, and then do any of the following:
- Choose Properties from the context menu to set audio & video properties. Please refer to “Set Audio & Video Properties” for more details.
- Choose Cut, Copy, Paste, or Delete from the context menu to cut, copy, paste, or delete the selected clip.
- To arrange multiple clips, do the following:
- Use Shift/Command + click to select multiple clips that you want to arrange.
- Right-click the play area of an anchor clip, and do any of the following:
- Choose Center to center the selected clips vertically, horizontally, or both.
- Click Align to align selected clips based on the anchor clip. This is available when you have selected two or more clips.
- Click Size to adjust the size of selected clips based on the anchor clip. This is available when you have selected two or more clips.
- Select Distribute to distribute the clips vertically or horizontally based on an anchor clip. This is available when you have selected three or more clips.
Set Audio & Video Properties
Audio & Video Properties
- To edit audio or video, firstly you need to make sure that you have chosen the Select Annotation command (choose Select > Select Annotation in any tab except for the File/Help/Accessibility tab) or Audio & Video command (choose Edit in the Ribbon > Audio & Video).
- Double-click the play area, or right-click the play area and select Properties.
- In the Appearance tab, specify the appearance of the selected audio or video.
- Annotation is hidden from view – Specify the visibility of the player area for the audio or video. If this option is checked, the play area will be invisible in Hand Mode.
- Border – Select the border width and the border’s style and color.
- Change Poster – Change a poster for the audio or video.
- In the Settings tab, you can specify the title, alternative text, and rendition settings.
- Annotation Title - Type the title of the audio or video in the Annotation Title box. This title does not determine which media file is played.
- Alternate Text - Type a description of the media file in the Alternate Text box.
- Renditions - Allow you to create alternate or other renditions to ensure that users can play the audio or video on their systems.
- List Renditions for Event - You can assign different renditions to different actions but Mouse Up is chosen by default. Mouse Up means that when the mouse button is clicked and released, the rendition is played.
- Add - There’re three ways for you to choose: Use a File, Use a URL, By Copying an Existing Rendition.
- Edit – When clicking the Edit button, the Rendition Settings dialog box appears, which allows you to specify the playback location, and other settings to differentiate it from other renditions. Please refer to “Rendition Settings” for details.
- Delete Delete the selected renditions.
- Up/Down – Arrange the order of the renditions. If the first rendition cannot be played, the next available rendition is played.
- In the Actions tab, add actions to the audio or video. For more information, please refer to “Actions tab”.
- After setting the properties, you can check the Locked option to lock the properties and prevent other users from changing them. Please note that checking the Locked option on any tab will lock all the options for the multimedia file in all the three tabs, but not just the current tab.
Rendition Settings
- Media Settings
- Rendition Name: Enter the name for the rendition, which will appear in the list of renditions. (This name does not determine which media file is played.) If you want to make the rendition accessible to JavaScript, check the Rendition is accessible to JavaScript option.
- Media Clip Location: Specify the clip by typing or navigating to it.
- Content Type: Content Type will be selected automatically when you specify the clip location. Changing the Content Type setting may cause problems playing the media.
- Embed content in document: Includes the media file into the PDF file. This option will increase the file size of the PDF. It is selected by default. If the check box is cleared, you will not be able to play it if you open this PDF file on other computers.
- Rendition Alternate Text: Type a description of the rendition.
- Allow temp File: Specify whether writing a temp file is allowed and when. Some media players write a temp file when they play a movie or sound clip. If you want to prevent users from easily copying the media content in a secure document, you may want to disallow the creation of temp files. However, selecting this setting may prevent the movie from being played by media players that require the use of temp files.
- Playback Settings
- Keep Player Open: Select whether you want the player to close after it plays the movie or sound clip.
- Volume: Let you specify how loud the movie will be played.
- Show player controls: Select to display a controller bar at the bottom of the play area allowing users to stop, pause, or play the media, provided the media player supports player controls.
- Repeat: Let you replay a clip two or more times, or continuously.
- Playback Location
- Playback Location: Select the location for playing a movie or sound clip.
- Background Color: Select the background color for the media player.
- Show title bar: Select to show or hide title bar when playing the media in a floating window.
- Show control closing window: Select to show or hide the close button at the top right corner in a floating window.
- Title Text: Add a title for the media that will be showed on the title bar when playing the media in a floating window.
- Resize: Determine to allow or forbid users to resize the floating window.
- Window Position: The window position is determined relative to the document window, application window, the virtual desktop or document monitor.
- Width/Height: Specify the width and height of the floating window.
- If Window is Off-screen: Select to play, do not play, or move window onto screen to play the media file if the floating window is off-screen.
Use current playback settings as default for this type of media: Set your settings as the new default for all the multimedia files you create in future.
Work with Layers
Foxit PDF Editor supports the ability to import, merge, flatten, reorder, rename, and delete layers in PDF documents, and change the properties of layers.
Show or Hide PDF Layers
- Do any of the following to open the Layers panel if it is hidden:
- Choose View in the menu bar > Navigation Panels > Layers.
- Click the Layers button
 in the Navigation panel.
- To hide a layer, uncheck the layer.
- To show a hidden layer, click the empty box and a checkmark will appear.
- From the Options menu at the top left corner of the Layers panel, choose one of the following:
- List Layers for All Pages – Show every layer across every page of the document.
- List Layers for Visible Pages – Show layers only on the visible pages.
- Reset to Initial Visibility – Reset layers to their default state.
- Expand All – Expand all layers.
- Collapse All – Collapse all of the current layers in the view.
- Apply Print Overrides – Determine whether to display a layer according to its corresponding Print setting in the Layer Properties dialog box. The option is available when Never Prints or Always Print is selected.
- Apply Export Overrides – Determine whether to display a layer according to its corresponding Export setting in the Layer Properties dialog box. The option is available when Never Exports or Always Exports is selected.
- Apply Layer Overrides – Display all layers in the document regardless of the settings in the Layer Properties dialog box, and you cannot change layer visibility until you deselect this command or choose Reset to Initial Visibility in the Options menu. However, you are still allowed to rename layers when the command is selected.
Import Layers
You can import layers from a PDF file or import images as layers into a target PDF file.
- In the Layers panel, click the Options menu
 at the top left corner, and choose Import as Layer.
 - In the Import as Layer dialog box, click Browse to choose a PDF file or an image file. If you import from a PDF file that contains multiple pages, choose a page number you want to import in the Page number field.
- Select one of the import options:
- Create new layer: Create a new layer from the source file. You can input a name for the new layer in the box.
- Add to group: Choose an existing layer group to add the imported layer. This option is only available when the target PDF document contains one or more existing layer groups, after the Create new layer option is selected.
- Add to existing layer: Add the imported content to an existing layer in the target document. The imported layer will have the same properties as the existing one. This option is available only when the target document contains layers.
- Copy layers from source: Import the layers from the source PDF file. This option is available only when the source PDF file contains layers.
- Complete the settings in Position and Appearance as needed.
- If the target PDF file contains multiple pages, specify the target page number to import the layers in the Preview area, and preview the results.
- Click OK.
Merge Layers
- In the Layers panel, click the Options menu at the top left corner, and choose Merge Layer.
- In the Merge Layers dialog box, do the following:
- Select the layers that you want to merge in the Layers to be merged pane, and click Add to selected layers. Or click Add All to add all layers listed in the Layers to be merged pane.
- If you want to remove the added layers, select the added layers that you want to remove in the center panel, and click Remove. Or click Remove All to remove all your added layers.
- In the Target Layers to merge into pane, select the layers into which you want to merge the selected layers.
- Click OK.
Note: Merged layers will have the same properties of the target layer. After you merge the layers, you cannot undo the operation.
Flatten Layers
In the Layers panel, click the Options menu at the top left corner, choose Flatten Layer, and confirm your operation.
Note: After the flattening operation, all layers will be consolidated, while the layers that are originally not visible will be removed. After you flatten the layers, you cannot undo the operation.
Delete Layers
- In the Layers panel, select the layer you want to delete.
- Choose any of the following methods, and confirm your operation.
- Right-click the layer, and choose Delete Layer from the context menu.
- Click the Options menu at the top left corner, choose Delete Layer.
- Press the Delete key on your keyboard.
Note: When you delete a layer, its corresponding content will be removed.
Reorder Layers
In the Layers panel, press the Option key while you click the layer’s name, and drag it to the desired location.
Note: You cannot reorder locked layers or layers in nested layer groups.
Edit Layer Properties
- Open the Layer Properties dialog box by one of the following methods:
- In the Layers panel, right-click the layer, and choose Properties.
- In the Layers panel, select a layer first, click the Options menu at the top left corner, and choose Layer Properties.
- In the Layer Properties dialog box, do the following:
- Layer Name - Edit the name for the selected layer.
- Intent – Select View and the visibility and properties of the layer can be edited at any time. Or, selects Reference to keep the current visibility and setting at all times until you switch to View.
- Default State – Define the initial visibility state when Visibility in Initial State is set to Visible When On.
- Visibility – Define the visibility of the layer when the document is opened or when the initial visibility is reset. If you choose Visible When On, the layer is visible only when Default State is On.
- Print – Define whether the layer will be printed when you print the PDF. If you choose Print When Visible, the layer will print only when the layer is visible.
- Export – Define whether the layer will appear in the resulting document when the PDF is exported to an application or file format that supports layers. If you choose Export When Visible, the layer will appear in the resulting document only when the layer is visible.
- The previous settings in Initial State (if any) are shown in the box at the bottom of the Layer Properties dialog box. You can click the plus sign
 to expand each group and check the previous settings.
Work with Image Annotations
Add an Image Annotation
You can add an image annotation to a PDF with the Image Annotation command.
To add an image annotation, do the following:
- Choose Edit in the Ribbon > Image Annotation.
- Drag a rectangle on the page to define the canvas area for the image.
- In the Add Image dialog box, click the Browse button to select the image that you want to insert.
- Click the Advanced button to edit the setting of the image.
- When to scale – choose when to scale the image you insert.
- Scale – choose to scale the image non-proportionally or proportionally. This option will be disabled when you select Never in the field of When to scale.
- Border – drag and move the scroll bar to change image’s position in the rectangle. The coordinates change when you move the scroll bar.
- Click OK for your changes to take effect, or click Reset to reset the data to the original settings.
- Click OK.
- (Optional) If you want to place the image annotation in the same position on multiple pages, do the following:
- Right-click the image annotation, and choose Place on Multiple Pages.
- In the Place on Multiple Pages dialog box, specify the page range and subset, and click OK.
Manage Image Annotations
After you insert a new image annotation, you can adjust its size and position, change the appearance and other settings, etc.
Move, Resize, or Delete Image Annotations
You can manage image annotations in the same way that you manage form fields. To move, resize, or delete an image annotation, please make sure that you have chosen the Select Annotation or Image Annotation command, and then follow the instructions in “Move a Form Field”, “Resize a Form Field”, and “Delete a Form Field”.
Set Properties of an Image Annotation
- Make sure that you have chosen the Select Annotation command or the Image Annotation command.
- Double-click the image or right-click it and select Properties.
- In the Appearance tab, do any of the following:
- Annotation is hidden from view – If this option is checked, the image annotation will be invisible in Hand command mode.
- Border – Select the border width of the image and the border’s style and color.
- In the Settings tab, follow the steps in “Add an Image Annotation”.
- For the Actions tab, please refer to “Actions Tab in Form Field Properties”.
- (Optional) To prevent any further changes to the image properties, check the Locked option in any tab.
- Click Close to apply the properties, and close the Image Properties dialog box.
Arrange Image Annotations
For existing image annotations in a PDF file, you can align, center, distribute, or resize them based on an anchor object. Arranging image annotations is similar to arranging form fields. For more information, please refer to “Arrange Form Fields”.
Search and Replace Text
The Search & Replace function allows you to quickly update the text that occurs multiple times in the document. Foxit PDF Editor will find the next occurrence of your specified text and replace it with your new text.
- Do any of the following to open the Search & Replace panel:
- Choose Edit in the Ribbon > Search & Replace.
- Or click the Advanced Search command
 on the ribbon, and choose Search & Replace in the dropdown list.
- The Search & Replace panel appears on the right side of application window.
- Type the text that you want to find and replace in the Find box, and the replacement text in the Replace With box. Only text objects in the document will be found, not including text in a bookmark, a comment, or form data.
- Click
 to specify the search criteria:
 - Whole Words Only: When selected, only instances that match the complete words specified in the Find box will be found.
- Case Sensitive: When selected, only instances that match the capitalization of the string specified in the Find box will be found.
- Click Find Previous button
 and Find Next button
  to locate the instance you need to replace, and click Replace to replace it with the replacement text.
 - (Optional) Replace All: Replaces all instances of the search text in the document with the replacement text.
Add and Edit Objects in a PDF
Add Objects in a PDF
You can add or insert new text, image, path, or shading objects into a PDF.
Add New Text Objects
- Click Edit in the Ribbon > Add Text.
- Click on the specific page you want to input the text and type new text.
Tip: With the Add Text command selected, as you click, hold, and drag the mouse, alignment guides (green lines) appear to help you find a location to align it to an existing object on the page. You just need to release the mouse at the desired location to add text. - In the Format panel, choose the font and paragraph formats as desired.
Add New Image Objects
- Locate the page where you want to add the image object.
- Click Edit in the Ribbon > Add Images.
- Select the image file in the pop-up dialog box, and click Open.
- The selected image will be added as an object in the PDF file. And you can click the image object to resize or move it, if necessary. Please refer to Manage Objects for more information.
Add New Shape Objects
Add a Path Object
- Locate the page where you want to insert the path in the document, and choose Edit in the Ribbon > Add Shapes > choose one path tool you need in the Add Path group.
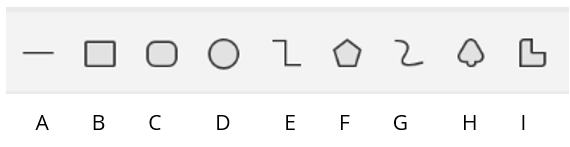
A: Line B: Rectangle C: Round Rectangle D: Ellipse E: Polyline
F: Polygon G: Beizer H: Closed Bezier I: Free Paint
(Optional) If necessary, turn on the “Snap to Grid” feature to snap the object to the grid lines or guides. Please refer to “Grids” for more information. - Do the following based on the path tool you have selected.
- To drag a straight line, rectangle, round rectangle, or ellipse, click and drag the cursor to draw the path you want.
Tip: While drawing the path with Rectangle, Round Rectangle, or Ellipse tool, you can press Shift to draw a square, round square, or circle. - To drag a polyline or bezier, click and drag the cursor to draw the first segment, then click at each point where you want a new line segment to appear, and double-click the last point to complete the drawing.
- To draw a polygon or closed bezier, click and drag the cursor to draw the first segment, then click on each point where you want a new line segment to appear, and double-click the start point (or the second-to-last point) to complete the drawing.
- To draw a custom path, click and drag the cursor directly, and release your mouse to complete the drawing.
- To drag a straight line, rectangle, round rectangle, or ellipse, click and drag the cursor to draw the path you want.
- After adding the path object, you can click the object to change its formats. For more information, please refer to “Change the Appearances and Properties”.
Add a Shading Object
- Locate the page where you want to insert the shading object in the document, and choose Edit in the Ribbon > Add Shapes > choose one shading tool you need in the Add Shading group.
- (Optional) If necessary, turn on the “Snap to Grid” feature to snap the object to the grid lines or guides. Please refer to “Grids” for more information.
- Follow the steps in “Add a Path Object” to add the object.
- After adding the shading object, you can click the object to change its formats. For more information, please refer to “Change the Appearances and Properties”.
Link and Join Text Blocks
To make editing easier, Foxit PDF Editor supports linking multiple text blocks together or connecting separate text blocks into one single paragraph.
Link and Unlink Text Blocks
Using the Link command, you can link multiple text blocks together and then editing text in these blocks will be treated as editing one paragraph. You can link text blocks not only on one page but also across pages. Text will reflow in these linked blocks.
To link text blocks, please do the following:
- Click Edit in the Ribbon > Link & Join Text, and the Join & Split Tool context tab appears on the ribbon. Select text blocks you need to link together and the selected blocks will be marked with numbers as you click them. If you need to clear the selection to reselect text blocks, click Select None in the Join & Split Tool context tab, or right-click the selected blocks and choose Select None.
- Click Link in the Join & Split Tool context tab, or right-click the selected blocks and choose Link Text Boxes. Then the blocks will be linked together.
- Then when you add or edit text in these blocks with the Edit Text command, the text will reflow in these linked blocks. And when the text added exceeds the final block, content followed the linked blocks will be covered because they have not been linked together.
To unlink a text block, please click Edit in the Ribbon > Link & Join Text, select the text block you need to unlink and then click Unlink in the Join & Split Tool context tab. You can also right-click the selected block and choose Unlink Text Boxes.
Note:
You can select and link text blocks that are discontinuous or in different columns, or that are not arranged from top to bottom or from left to right on the page.
Join and Split Text Blocks
With the Join command, you can connect blocks of text into one single paragraph in a block to improve text reflow. Blocks of text may be joined together when you need to join text as one object. Otherwise, a block of text can be divided up into several parts with the Split command.
To join text blocks, do the following:
- Click Edit in the Ribbon > Link & Join Text, and the Join & Split Tool context tab appears on the ribbon.
- Click the text blocks you want to join. The text blocks you selected will be numbered. If you need to clear the selection to re-select text blocks, click Select None in the Join & Split Tool context tab, or right-click the selected blocks and choose Select None.
- Click Join in the Join & Split Tool context tab, or right-click the selected blocks and select Join Text Boxes. Then the selected blocks will be joined together as one block.
To split a text block, please click Edit in the Ribbon > Link & Join Text button and click the text block you want to split. Click Split in the Join & Split Tool context tab, or right-click the selected block and select Split Text Boxes. Then the selected block will be divided.
Note: All selected blocks should be on the same page.
Edit Objects in a PDF
Edit Text in a Paragraph
With Foxit PDF Editor, you can either edit text in a paragraph like Microsoft Office Word or edit text as an independent object.
To edit text in a paragraph, please do the following:
- Click Edit in the Ribbon > Edit Text.
- Click on the desired paragraph to start editing. You can select the text and change its formats in the Format panel.
Edit Text Objects
Edit a Text Object
To edit a text object, please do the following:
- Click Edit in the Ribbon > Edit Object > Text.
- Select the text object you want to edit, and move, resize, or rotate it as desired. Please refer to Manage Objects for more information.
- Double-click the text object you want to edit, and then you can add, delete text, or change font formats for the selected text. For more information about changing the font formats, please refer to “Change the Appearances of Objects in the Format Panel”.
Convert Text Objects to Shape Objects
Foxit PDF Editor supports to convert the selected text object(s) into path(s), which will meet the pre-press requirement. For those computers that do not support or display certain embedded fonts, this new feature helps to overcome that issue. To convert text objects to shape objects, select the text objects, and do one of the following:
- Right-click the selected text objects, and choose Convert to shape object.
- Click the Convert to Shape icon in the Split group in the Format panel.
Merge and Split Text Objects
- To merge text objects, select the objects, and click the Merge Text icon
 in the Split group in the Format panel.
- To split a text object, select the text object, and click the Split Text icon
 in the Split group in the Format panel. Then in the Split Text dialog box, click the position you want to split, and click OK to apply the setting.
Remove Kerning for Text Objects
You can remove the space between the letters of words to improve the appearance of text content by clicking the Remove Kerning icon  in the Split group in the Format panel.
Edit Image and Shape Objects
- Click Edit in the Ribbon > Edit Object > the corresponding object tool.
- Select the object you want to edit, and then you can move, resize, rotate, and do more with the objects. For more information, please refer to “Manage Objects”.
- For the image object, you can choose the options from the Edit Using Other Application group in the Format panel (or from the Edit Using drop-down list from the context menu) to edit it with the supported applications installed on your devices. After you complete editing, directly save your changes in the editing application. The image will be also automatically updated in your PDF at the same time.
Manage Objects
When you select one or more objects, the selected objects will be outlined by a bounding box, and the Format panel will be displayed on the right of the document pane by default. Then you can change the appearances, resize, move, arrange objects, and much more.
Select Objects
- Click Edit in the Ribbon > Edit Object, choose Text/Image/Shape/Shading from the drop-down list to select the corresponding objects in the PDF file, or choose All to select all kinds of objects in the PDF file.
- Click the object to select it, or use Command/Shift + click to select multiple objects.
- Hold the pointer over the objects and drag a rectangle to select all the objects in that rectangle.
- Press Command + A to select all the objects on the current page.
Tip: To deselect all the objects, click any blank area in the document.
Move Objects
To move objects, select the objects first, and then do one of the following:
- Directly drag the objects to the desired place. While moving objects, you can optionally turn on the “Snap to Grid” feature to snap the objects to grid lines or guides. Please refer to “Grids” for more information.
- Right-click the objects, and choose Cut from the context menu. Then right-click the desired place, and choose Paste.
- Right-click the selected objects, and choose Properties. Then input a value in the Position X or Position Y box in the properties dialog box.
Resize Objects
To resize objects, select the objects first, and then do one of the following:
- Drag any of the small rectangles shown on the border of the bounding box.
- Right-click the selected objects, and choose Properties. Then input a value in the Width/Height or Scale X/Scale Y box in the properties dialog box.
Rotate Objects
To rotate objects, select the objects first, and then do one of the following:
- Hold the Rotate icon
 shown on the border of the bounding box, and drag the cursor.
- Right-click the selected objects, and choose Rotate. From the Rotate drop-down list, select Clockwise/CounterClockwise to rotate the objects clockwise or counter-clockwise by 90 degrees, or select More Rotation Options to rotate the objects by specified degrees.
- From the Rotate group in the Format panel, click
 or
or  to rotate the objects clockwise or counter-clockwise by 90 degrees. Or input a value in the Customize Rotation box
  and press Enter to rotate the objects by a custom value.
Flip Objects
To flip objects, select the objects first, and then do one of the following:
- Right-click the selected objects, and choose Flip > Vertically or Horizontally.
- From the Rotate group in the Format panel, click
 or
or  to flip objects horizontally or vertically respectively.
Change the Z-order of an Object
When objects overlap on a layout, one object will be on top of all other elements. You can control how the overlapping objects are displayed by changing the Z-order (stacking order).
To move an object to the front or back of all other elements, select it, and do one of the following:
- Right-click the selected object, and choose Arrange > Bring to Front or Send to Back.
- From the Z-order group in the Format panel, click
 to send the object behind other elements, or click
  to bring the object in front of the other elements.
To move an object up or down one level in a stack, select it, and do one of the following:
- Right-click the selected object, and choose Arrange > Bring Forward or Send Backward.
- From the Z-order group in the Format panel, click
 to move the object backward one level, or click
  to move the object forward one level.
Clip Objects
Foxit PDF Editor allows you to create clipping marks (clipping paths) to mask other artwork and make only the area within the clipping shape visible. You can only clip one object at a time.
- Select the object that you want to clip, and do one of the following:
- Right-click the object, choose Add Clip Path, and select one clipping shape from the drop-down list.
- Select one clipping shape from the Clipping group in the Format panel.
- When you select a clipping shape, the selected object will be magnified to fill your current view for easier operation. Drag the cursor to draw a clipping shape. After drawing the clipping shape, you can still drag the dots on the border to adjust the shape, or move the clipping shape to adjust the clipping area.
- Click on the area outside the object to apply the clipping. The page will return to the normal view when the clipping is applied.
- If you need to modify the clipping, do the following:
- To edit the clipping path, right-click the clipped object and choose Edit Clip Path, or click
 in the Clipping group in the Format panel. Then follow the steps above to draw a clipping shape.
 - To restore the clipping, right-click the clipped object, and select Clear Clip Path. Or click
 in the Clipping group in the Format panel.
- To edit the clipping path, right-click the clipped object and choose Edit Clip Path, or click
Shear Objects
Select the objects first, and then do one of the following:
- Right-click the objects, and choose Shear in the context menu. Enter a value in the pop-up dialog box to shear the object and click OK to finish.
- In the Format panel, input a value in the Shear box in the Effect group, and press Enter.
Delete Objects
To delete objects, select the objects first, and then do one of the following:
- Press the Delete key.
- Right-click the selected objects, and choose Delete from the context menu.
Arrange Objects
You can align, center, distribute, or resize the objects based on an anchor using the options in the Format panel or context menu. For more information, please refer to “Arrange Form Fields”.
Change the Appearances and Properties
Change the Appearances of Objects in the Format Panel
By default, when you select an object with an Edit tool, the Format panel will be displayed automatically on the right of the document pane. You can hide the Format panel by clicking on anywhere along its left border. Foxit PDF Editor will remember the display status of the Format panel and keep it as it is until you re-adjust it manually. To re-display the Format panel after it has been hidden or closed, please click on its left border again.
In the Format panel, you will find the following groups based on the object you have selected:
- Text Style: Set the font, font color, font style, font size, text alignment, character spacing, etc. The availability of each option varies based on the object you have selected. For more information about the options, please refer to “Buttons in the Text Style Group”.
- Split: Merge, split, or convert text objects. You can also remove the kerning between words. For more information, please refer to “Edit Text Objects”.
- Shape Style: Change the line color, width, opacity, and more for the path objects. For more information about the options, please refer to “Buttons in the Shape Style Group”.
- Shading Style: Change the opacity and gradient effect for the shading objects. For more information about the options, please refer to “Buttons in the Shading Style Group”.
- Arrange: Center, align, distribute, or rotate the selected objects. Move objects forward or backward. For more information, please refer to “Arrange Objects”, “Rotate Objects”, and “Change the Z-order of an Object”.
- Effect: Change the opacity of image/text objects, and clip and shear objects. For more information, please refer to “Opacity”, “Clip Objects” and “Shear Objects”.
Buttons in the Text Style Group |
||
Button |
Name |
Description |
 |
Font |
Change the font style. Click on the drop-down menu to choose a font style. |
 |
Font Size |
Change the font size. Click on the drop-down menu to choose a font size. Or input a value in the box and press Enter to apply it. |
 |
Font Color |
Simply click on the font color button to apply the color shown to the text. |
 |
Bold |
Text with bold formatting has thicker strokes than its ordinary form. |
 |
Italic |
Text with italic formatting leans to the right. |
 |
Underline |
Draw a line under the text. |
 |
Strikethrough |
Draw a line to cross out text, making others know the text is deleted. |
 |
Superscript |
Decrease the font size proportionally and raise the baseline, like the trademark. |
 |
Subscript |
Decrease the font size proportionally and lower the baseline, like a footnote. |
 |
Align Left |
Align the left edge of the paragraph to the left margin. |
 |
Center |
Center each line of the paragraph with even space on both sides. |
 |
Align Right |
Align the right edge of the paragraph to the right margin. |
 |
Justify |
Align both sides of the paragraph with both margins. |
 |
Increase Indent |
Move the paragraph farther away from the left margin. |
 |
Decrease Indent |
Move the paragraph closer to the left margin. |
 |
Bullets |
Create a bulleted list for paragraphs. Click on the drop-down menu to choose a bullet style. |
 |
Numbering |
Create a numbered list for paragraphs. Click on the drop-down menu to choose a number style. |
 |
Writing Direction |
Set the writing direction (left-to-right or right-to-left) in which you type text. |
 |
Line Spacing |
Set the space between each line in a paragraph. |
 |
Paragraph Spacing |
Set the space between two paragraphs. |
 |
Character Scale |
Set the width of each character. |
 |
Character Spacing |
Set the space between each character that you type. |
 |
Word Spacing |
Set the space between each word. |


Buttons in the Shading Style Group |
||
Button |
Name |
Description |
Preset Style |
Foxit PDF Editor provides popular preset styles at the top part of the Shading Style group. Select it to apply the preset style to the object. | |
 |
Opacity |
Set the opacity of the object by dragging the slider. |
 |
Gradient Stops |
Describe the location and color of a transition point in a gradient. |
 |
Reference Line |
Change the setting of the gradient reference line. |
Change the Properties of Objects in the Properties Dialog Box
- With the Edit Object command, right-click the object, and choose Properties.
- In the General tab, you can specify the position, size, and scaling for the selected object.
- Position X/Position Y: Allow you to set the precise horizontal and vertical position of the objects.
- Width/Height: Set the width and height for the selected objects.
- Scale X/Scale Y: Scale the object along the X-axis or Y-axis.
- In the Appearance tab, you can specify the text style and shape style for the selected objects. For more information about the options, please refer to “Change the Appearances of Objects in the Format Panel”.
- When you complete the settings, click Close to apply the settings and close the properties dialog box.
- (Optional) If you want to set the properties as default for further application, right-click the object, and select Set Current Properties as Default from the context menu.
Work with Articles
For PDF documents that include articles and arrange text content in multiple columns and across several pages, you may need lots of scrolling or zooming to navigate the articles. To make article viewing effective, Foxit PDF Editor allows you to define a navigational path (or an article thread) for an article in the document by marking out a series of boxes around the article content in the order you want the content to be viewed in. With article threads, you can skim through a document, focusing on a specific article and ignoring the rest, as you do in a traditional print newspaper or magazine.
Define Articles
To define an article, please follow the steps:
- Choose Edit in the Ribbon > Add Article Box. The cursor changes into a Cross
 automatically.
 - Click and drag a rectangle around the content to be the first article box. A black rectangle appears around the content with a label, and the cursor changes into the article pointer
 .
.
The label for each article box is made up of the article number and the sequence number within the article. For instance, the first box for the first article in the document is labelled 1-1, the second box 1-2, the third box 1-3, and so on. And the boxes for the second article in the same document are labelled 2-1, 2-2, 2-3, and so on. - Repeat the operation in Step 2 to mark out the rest of article boxes followed. (Note: If you need to resize or move an article box during the article defining, you must end the article first.)
- When you have defined the entire article, press Enter to end the article.
- Type the information in the pop-up article property dialog box as needed and then click OK.
- Then in the Articles panel in the navigation pane you can see the article defined. The Articles panel lists all of the articles included in the document.
View Articles
- Follow one of the steps below to open the Articles panel if it is hidden:
- Choose View in the menu bar > Navigation Panels > Articles.
- Click the Articles icon
 in the navigation pane. If you cannot find the Articles icon in the navigation pane, right-click anywhere along the left sidebar on the navigation pane, and choose Articles.
- In the Articles panel, do any of the following to start viewing:
- Double-click the article you want to view.
- Right-click the article you want to view and choose Read Article from the context menu.
- Select the article you want to view and choose Read Article from the options menu in the upper left corner of the Articles panel.
- The pointer will change into
 and you will be switched to the beginning of the article (the area of the first defined article box). The page view may zoom in or out automatically so that the current part of the article fills the screen, with the first line appearing in the upper left corner.
 - During the article viewing, do any of the following:
- Click in the article or press Enter to navigate to the area of next article box.
- Shift-click in the article or press Shift + Enter to navigate to the area of previous article box.
- At the end of the article (the area of the last defined article box), clicking in the article will return to the beginning of the article and exit the article reading mode.
Notes:
- Before viewing an article, make sure you have selected the Hand tool and the option Make Hand Tool read articles in the File tab (or Foxit PDF Editor menu)> Preferences > General.
- You can select Hide After Use in the options menu in the upper left corner of the Articles panel to hide the panel after the article viewing starts.
Modify Articles
You can rename and delete articles, move and resize article boxes, edit article properties, and more.
Rename Articles
To rename an article, click the article name directly in the Articles panel and type a new name for it, or right-click the article and choose Rename to rename it.
Move and Resize an Article Box
To move an article box, select the article box with the Add Article Box command. Then drag the box to the desired position.
To resize an article box, select the article box with the Add Article Box command. Then drag a handle of the box.
Note: To select an article box with the Add Article Box command, you need to click on the label of the box. When an article box is selected, you can see the selection handles ![]() appear on the borders of the article box with a plus sign
appear on the borders of the article box with a plus sign ![]() at the bottom of the article box.
at the bottom of the article box.
Delete an Article or Article Box
To delete an entire article, do any of the following:
- Right-click the article in the Articles panel and choose Delete.
- With the Add Article Box command select any article box of the article in the document. Then right-click the selected article box and choose Delete. In the pop-up dialog box, choose Article to delete the article.
To delete an article box, select the article box you want to delete with the Add Article Box command. Then right-click the box and choose Delete. In the pop-up dialog box, choose Box.
After an article or an article box is deleted, the remaining articles or article boxes in the document will be automatically renumbered.
Edit Article Properties
You can edit the article title, subject, author, and keywords in the article property dialog box. To open the article property dialog box, do any of the following:
- Select the article, and choose Properties from the options menu in the Articles panel.
- Right-click the article, and choose Properties from the context menu in the Articles panel.
- Double-click any article box of the article in the document with the Add Article Box command.
- Select any article box of the article in the document with the Add Article Box command. Then right-click the article box and choose Properties… from the context menu.
Insert article boxes into an article thread
- With the Add Article Box command select the article box that you want to the new article box to follow in the document.
- Click the plus sign at the bottom of the box and the pointer changes into
 . Then you can click and drag a rectangle around the desired content to be the new article box. If you click without dragging, a prompt pops up telling you to click and drag out to create a new article box.
 - (Optional) You can continue dragging to insert more article boxes as needed.
- Press Enter after you insert all the content you need.
- Then you can see the sequence number of the new box follows that of the box selected in Step 1, and all following article boxes are renumbered automatically.
Combine Two Articles
- With the Add Article Box command select any article box of Article 1 in the document.
- Click the plus sign at the bottom of the box and the pointer changes into
 .
. - Command-click any article box of Article 2.
- Then you can see Article 2 is appended to the end of Article 1, and all article boxes are renumbered automatically. In the Articles panel, the two articles are combined to one article named with the title of Article 1 by default. Rename the combined article as needed.
Create Links in a PDF
Links help you to lead the readers to related articles, references, or the intended web page.
Rectangle Links
Add a Rectangle Link
- Click Edit in the Ribbon > Link.
- Position the cursor on the place you want to add the link, hold and drag your mouse button to draw a rectangle.
- In the pop-up dialog, do the following:
- Specify the link appearance in the Appearance group.
- Select one of the following link actions in the Destination group:
- Go to a page view: To designate the link to a specific page view, check Go to a page view option > click Next > scroll the document to the position where you want to set destination > click Set this position.
- Open/execute a file: To designate the link to open a specific file, check Open/execute a file option > click Next > select the destination file and click Open.
- Open a web link: To designate the link to open a web page, check Open a web link option > click Next > input the URL address or select an address you have added before from the drop-down list > click OK.
- Others (View Action Properties dialog box): Open the Link Properties dialog box to view, add, or edit the link actions.
Move or Resize a Rectangle Link
You can move and resize the rectangle link after you create it.
- Select the Link tool in the Edit tab, and then click on the link to select it.
- To move the link, drag it to the desired position.
- To resize the link, drag any corner point to adjust its size as desired.
Delete a Rectangle Link
- Select the Link tool in the Edit tab.
- Do any of the following:
- Click the link that you want to delete, and press the Delete key.
- Right-click the link that you want to delete, and choose Delete from the context menu.
Web Links
Foxit PDF Editor enables you to find and convert URLs in text format to web link objects. Web link objects can guide you to corresponding websites directly when you click them in the default tool mode. With Foxit PDF Editor, you can also convert linked web page to PDF and append it to your PDF file.
Create Web Link Objects from URLs
By default, Foxit PDF Editor will detect URLs in text format and convert them to web link objects automatically when you open a PDF file. If you do not want to create web link objects automatically, please go to File tab (or Foxit PDF Editor in the menu bar) > Preferences > General, and uncheck the Create links from URLs option in the Basic Tools group.
To create web link objects manually, please do the following:
- Click Edit in the Ribbon > Web Links > Create links from URLs.
- A message box will pop up to ask you whether to proceed because the operation cannot be undone. If you do not want to see the prompt message again, check Don't ask again option. Then click OK to continue.
- In the pop-up Create web links dialog box, check the option to specify the pages on which you would like to create web link objects. When you select the Pages option, choose the page number from the drop-down list or input the page range in the From and To boxes.
- Click OK to create web link objects.
Remove Web Link Objects
- Click Edit in the Ribbon > Web Links > Remove all links.
- Click Yes to confirm your operation.
- In the pop-up Remove web links dialog box, check the option to specify the pages on which you would like to remove web link objects. When you select the Pages option, choose the page number from the drop-down list or input the page range in the From and To boxes.
- Click OK to remove web link objects.
Append All Web Links on the Current Page
You can download all web links on the current page and convert the linked web pages to PDF pages that will be appended to the end of the current PDF. Steps are as follows:
- Click Edit in the Ribbon.
- Click Web Links in the Edit tab, and choose Append All Web Links on Current Page.
By default, only one level of the linked websites is converted to PDF pages. After conversion, the downloaded links in the document will change to internal links that jump to the converted page in the document when you click them.
Append Selected Web Links on the Current Page
Besides appending all web links at one time, Foxit PDF Editor also allows users to view all web links on a page, and select links as desired to convert the linked web pages with custom settings to PDFs that will be appended to the end of the current PDF.
- Click Edit in the Ribbon > Web Links > View Web Links.
- In the Select Page Links to Download dialog box, you can view all web links in the current page. Then do the following:
- Select one or more links that you want to download. You can click Select All to select all web links in the dialog box, or click Clear All to clear your selections.
- (Optional) When you select a link, click Properties to customize the settings about conversion and page layout.
- In the General tab, you can specify the following conversion settings:
- Convert only_Level (s): Input a number in the box or click the Up/Down arrow beside the box to specify the number of levels of the website to convert to PDF.
- Convert webpages on the same path: Convert the webpages subordinate to the input URL.
- Convert webpages on the same server: Convert the webpages stored on the same server.
- Convert the entire site: Convert all levels from the website.
- Set timeout: Input a number in the box or click the Up/Down arrow beside the arrow to set the timeout to load the whole web page. Loading that takes longer will be aborted automatically, and only the loaded content will be converted to PDF. The default value is 120s.
- Disable all hyperlinks in the generated PDFs: Check this item, and all hyperlinks will be invalid in the generated PDF.
- Set all the page contents to one single PDF page: Check this item, and all the related content will be converted to one PDF page.
- Create bookmarks: Check this item, and bookmarks for converted web pages will be created automatically after conversion. The created bookmarks are named with the domain names of the web pages. If the web pages share the same domain name, sub-bookmarks will be created and named with the page titles. If the page has no title, the URL is used instead.
- Create PDF Tags: Check this item to create a tagged PDF that includes tags and other accessible information such as alt-text for images.
- In the Page Layout tab, you can specify the page size, margins, and orientation for the generated PDF.
- After specifying the properties, click OK to confirm.
- In the General tab, you can specify the following conversion settings:
- Click Download to download your selected web link (s).
After the downloading completes, you can see the linked web pages are successfully converted and appended to the end of the current document. Please note that after conversion the downloaded links in the document will change to internal links that will jump to the converted pages in the document when you click them.
Optimize PDF Files
With the PDF optimizer, users can update the PDF version and reduce file size by compressing contents, unembedding fonts, and clearing out the data redundancy of PDF objects. Users can optimize PDFs with custom advanced settings, or reduce file size quickly with the default settings.
Note: During the optimization, PDF Optimizer doesn’t optimize file attachments in the document, including attachments added to the PDF as comments.
Reduce File Size with Default Settings
You can use the Reduce File Size command to quickly optimize documents with the default settings, which are suitable for a wide range of documents. With this command, you can also reduce file size for multiple files at the same time.
Reduce the Size of the Current File with Default Settings
- Choose File in the Ribbon > PDF Optimizer > Reduce File Size > Current File.
- In the pop-up Reduce File Size dialog box, choose Retain existing to keep the current PDF version, or choose a desired PDF version from the drop-down menu. And then click OK to start the optimization.
- Specify the file name and the location to save the optimized file in the pop-up dialog box. Then click Save to save the optimized file.
Reduce the Size of Multiple Files with Default Settings
- Choose File in the Ribbon > PDF Optimizer > Reduce File Size > Multiple Files.
- In the pop-up Optimize Multiple Files dialog box, do the following:
- Click Add Files to add files, folders, or currently opened files.
- Use Move up, Move down, and Remove to adjust the order of the files, or delete the files that you have added from the list.
- Click Output Options, and the Output Options dialog box pops up where you can select the destination folder and choose how to name the new files and whether to overwrite existing ones.
- Click OK to continue.
- In the pop-up Reduce File Size dialog box, choose Retain existing to keep the current PDF version, or choose a desired PDF version from the drop-down menu. And then click OK to start the optimization.
- (Optional) If you choose not to overwrite the existing files in the Output Options, specify the file name and the location to save the optimized file in the pop-up dialog box. Then click Save to save the optimized file.
Advanced Optimization
With the Advanced Optimization command, you can select professional settings to achieve advanced PDF optimization. To optimize PDF with advanced settings, please do as follows:
- Choose File in the Ribbon > PDF Optimizer > Advanced Optimization group > Advanced Optimization.
- In the PDF Optimizer dialog box, choose an option from the Predefined Settings drop-down list to optimize the PDF file with the preset advanced settings. Or follow the steps below to customize the settings.
- Click Audit space usage to check the space usage of the current PDF file and then you can decide which items to be optimized.
- From the Make compatible with dropdown list, select Retain existing to keep the current PDF version, or select a desired PDF version to save the optimized PDF file that is compatible with the selected PDF version. The settings available in the following steps vary from different PDF versions.
- Check the following group to activate its settings and specify the options in the corresponding panel:
- Compress Images: Specify downsampling and compression settings for color,grayscale, and monochrome images.
- Downsample: Choose an appropriate downsampling method from the dropdown list and specify the pixels to apply downsampling to images that exceed the specified pixel. Choose Off from the dropdown list to turn off downsampling.
- Compression: Choose a compression method to eliminate unnecessary pixel data. For JPEG, JPEG2000, and JBIG2 compression, you can specify the compression level from the Quality drop-down list. Choose Retain existing to keep the current compression method.
- Quality: This option is only available when you choose JPEG or JPEG2000 compression for color/grayscale images or JBIG2 compression for monochrome images. For JPEG compression, you can apply it at five different levels. For JPEG 2000 compression, you can also apply lossless compression so that no pixel data is removed. For JBIG2 compression, you can choose to apply lossless or lossy compression.
- Tile Size: This option is only available for JPEG 2000 compression, which divides the image to be compressed into tiles of the given size. The default value is 256.
- Compress images only if there is a reduction in size: When this option is checked, the optimization for the images will be skipped if the image settings will cause an increase in file size.
- Unembed Fonts: Unembed fonts in the PDF document to reduce file size. When you view a PDF document on a system that does not have the original fonts, substitution font will be used to display the text. To unembed fonts, choose the font from Embedded fonts list, and click Unembed. If you want to prevent unembedding all fonts in the document, check the Do not unembedded any font option.
- Transparency: If your document includes content that contains transparency, you can use the preset settings in the Transparency panel to flatten transparency to help reduce the file size.
- Discard Objects: Specify the objects to remove from the PDF file.
- Discard User Data: Discard user related information.
- Clean Up: Remove useless items (like invalid bookmarks and links) from the PDF document.
- Compress Images: Specify downsampling and compression settings for color,grayscale, and monochrome images.
- (Optional) To save your optimization settings above for future use, click the
 icon at the top of the dialog box and input a name for the optimization. Your saved optimization will be listed as options in the drop-down list for the Predefined Settings item at the top of the dialog box. To delete your saved optimization options, select the option from the drop-down list, and then click the
  icon next to the list.
 - Click OK to apply the optimization, and then save the optimized PDF file.
Optimize Scanned PDF
Foxit PDF Editor supports the size optimization of scanned PDFs during PDF creation from a scanner or by choosing File in the Ribbon > PDF Optimizer > Optimize Scanned PDF group > Optimize Scanned PDF in an existing scanned or image-based PDF. See also “The Optimization Options in Custom Scan”.
Spelling Check
Foxit PDF Editor allows users to check the spelling of PDF files and provides suggestions to correct misspelled words. This feature is useful when users want to proofread text. You can check for possible mistakes and then confirm each correction.
Before using the spell check feature, you can choose File in the Ribbon (or Foxit PDF Editor in the menu bar) > Preferences > Spelling to specify the spelling preferences, including enable/disable automatic check and add/remove/reorder dictionaries.
By default, Foxit PDF Editor automatically checks the spelling when you edit text, add text comments, or fill in text fields in interactive PDF forms. The suspected misspellings will be underlined with red squiggly lines. You can right-click a misspelled word to find suggestions and correct it quickly.
If you need to check spelling within an entire document, please do the following:
- Make sure that the Enable check spelling option is checked in File tab (or Foxit PDF Editor in the menu bar) > Preferences > Spelling.
- Click Edit in the Ribbon > Check Spelling.
- In the pop-up Check Spelling dialog box, you will see the suspect word and suggestions for correction.
- Ignore – Click Ignore if no correction is needed.
- Ignore All – Click Ignore All to skip all further occurrences of the current “misspelling”.
- Change – Click Change after selecting one suggestion to make the suggested correction.
- Add To Dictionary – Click Add to Dictionary if the suspect word is spelled correctly but doesn’t appear in Foxit PDF Editor’s dictionary. Choosing Add to Dictionary adds the word to Foxit PDF Editor’s custom dictionary, which is a supplemental list of spelled-correctly words used to proofread a document.
- Cancel – Click Cancel to exit the Check Spelling dialog box.