Account Settings
In this section, you will learn about the settings for the company/organization account and the document fields.
Steps to Update Account Settings
You can set up your account information fields under the ‘Accounts Settings’ page.
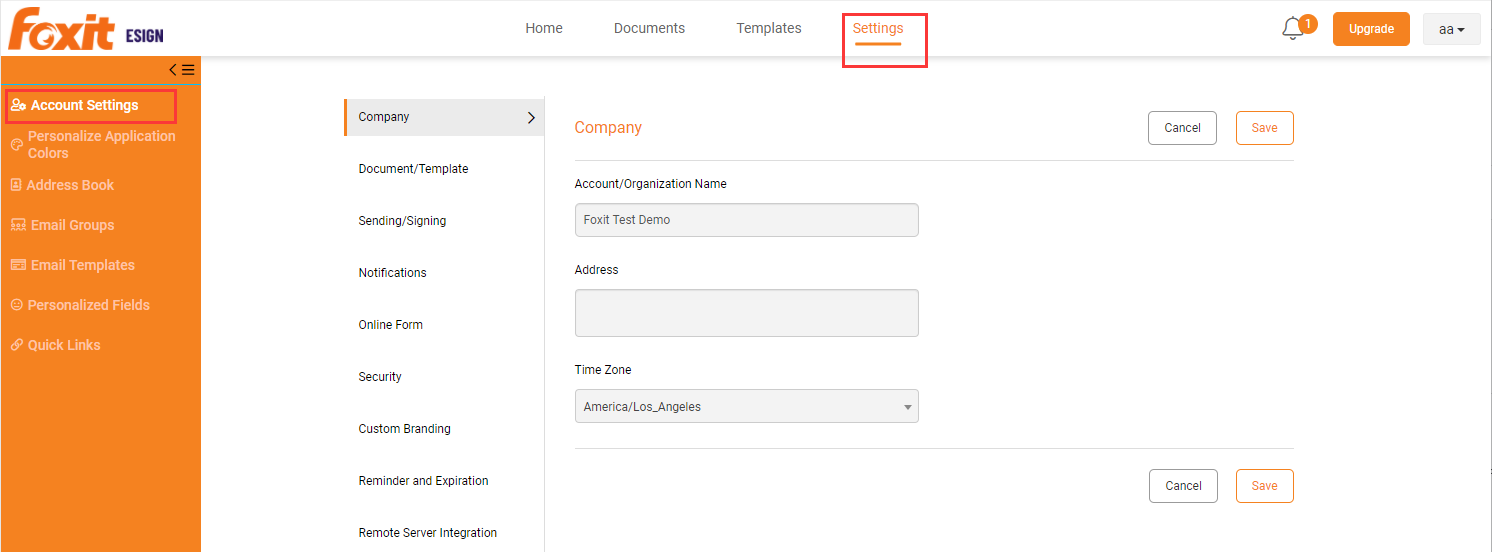
- Account/Organization Name:
User can update their account or the organization name. This name is also used in the emails for the eSignature recipients. - Address:
User needs to update their company address. - Time Zone:
Users can select the time zone as per their region/preference. - Date Format:
Date format for your account will default while creating a document or template. The default date format can be modified for each document if required. It is highly recommended to set up your default date format to save time while creating the document. - Send-Document Complete Notifications to Account Owner:
You may select the option either for sending the document complete notifications to the account owner. - Attach Certificate to Document PDFs:
Users can see the signature certificate at the end of each document PDF if they have selected “YES” for ‘Attaching the certificate to document PDF’s’. - Default Signature Option:
Users may select the default signature option for the signer and once they are ready to sign it will display the selected option i.e. from “Type”, “Draw” or “Upload”. If you want to restrict the recipient to sign using ONLY the default option selected, select ‘Yes’ for ‘View Only Default Sign Option’. - Select Fonts for the Typed Signature:
If you selected the option to “Type”, you can further restrict the signature option and use only allowed fonts types. - Send PDF with Completion Notification:
In order to send the PDF attached in the e-mail notification once the document is executed to the signer party and the sender then we need to select “Send PDF with Completion Notification” as yes else no. - Default Fields Navigation:
While signing documents, the recipient fills out the values for the fields assigned to him/her. Selecting the ‘All’ option will make the recipient tab across each field on the document before signing whereas the ‘Only Mandatory’ option will bypass the optional fields while tabbing through. - Display Indicators in Document Draft Mode:
If the fields on the documents are too close to each other, the fillable field name indicators may overlap with the next fillable field(s). Selecting ‘No’ will turn off the recipient name indicator on the document under draft status. This option can be changed on the draft document by simply selecting the ‘Display Recipient’ from the ‘More Actions’ menu on the top right corner. - Save your changes when done.
Custom Branding
This feature is available to Foxit eSign Pro and Foxit eSign Enterprise users, which allows the company logo to appear on Foxit eSign webpages and email communications in place of Foxit eSign Logo.
Reminders and Expiration
Reminders and Expiration feature allows the author (admin and account users) to add the reminder and expiration settings for the document.
After adding the reminder and expiration settings, the reminder emails will be sent to the signers automatically to sign the document. Reminder and expiration settings are defaulted on each document and can be changed from the document actions menu by selecting the advanced sending options.
How to use this feature?
Go to the Settings tab, select the Account Settings option and scroll down to Reminders and Expiration block.
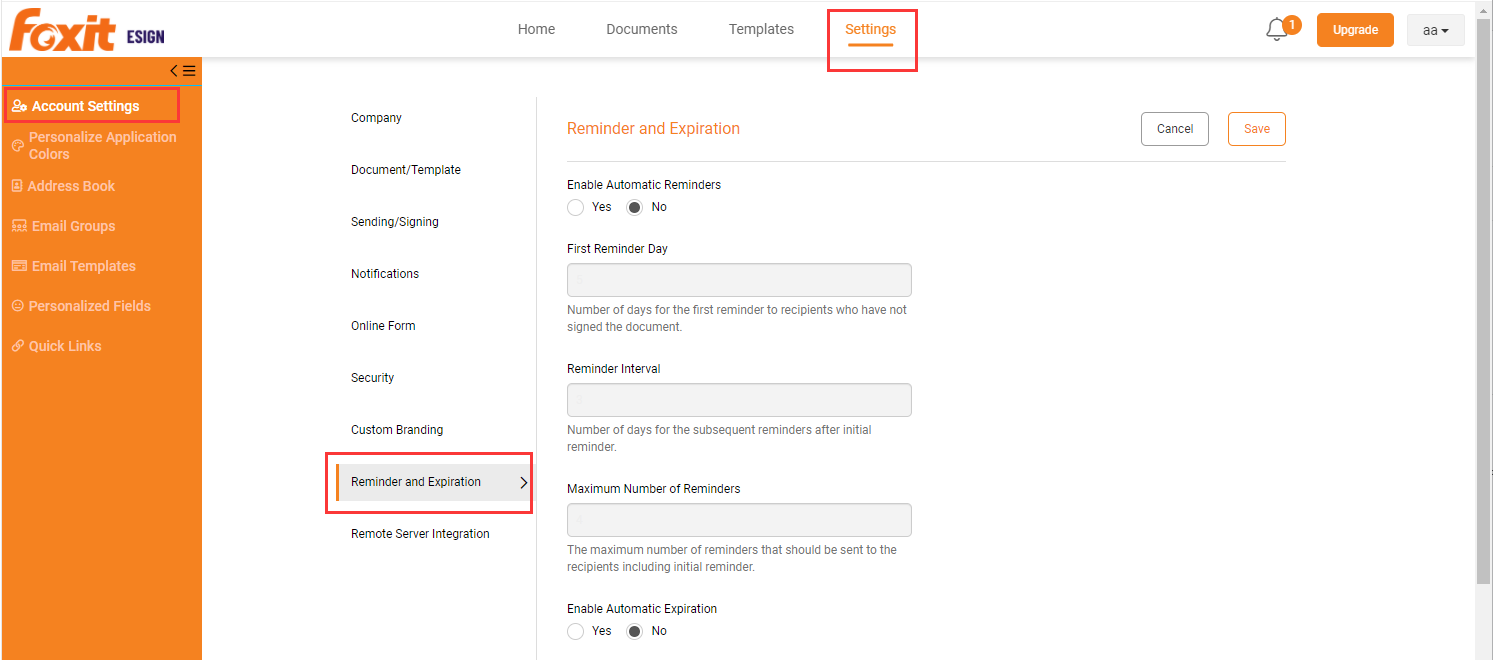
Reminders:
(Default: No)
To enable the reminder mail click ‘Yes’ on Enable Automatic Reminders this allows you to make settings to send the reminder mail to the recipient to sign the document.
Once you click “yes” to enable the reminders it enables all the options where you specify when and how often to send notifications to the signer to complete the signature process.
- First Reminder Da :
This field allows you to select the number of days for the first reminder sent to recipients who have not signed the document. It accepts only the numeric value. - Reminder Interval:
In this field, you may enter a number of days for the subsequent reminders after the initial reminder. - Maximum Number of Reminders:
This field allows you to enter the maximum number of reminders that should be sent to the recipients including initial reminders.
Expiration:
(Default: No)
To enable the expiration settings, click ‘Yes’ to enable automatic expiration.
- Expiration Day:
In this field, you can enter the number of days after which the document will automatically expire if it has not been signed by all the parties/signers.
- Warning day before Expiration:
In this field, you can assign a number of days before expiration when a final reminder will be sent to the signers who have not signed the document.
Click on the Save button to update the reminder and expiration settings.
Override the reminders and expiration settings:
You may also override the settings for the specific documents folder.
You need to follow the below steps to override the reminders and expiration settings:
Before sending the document, click on “More Options”, select the Advance Sending options from there.
(Default: No)
It will open the screen, where you can override the account default settings for the particular document.
To enable the override feature, select “Yes” to override account default settings. It will enable to override the default reminders and expiration settings.
Account Users Settings
The users listed on the Account Users page are the user accounts that have been assigned Foxit eSign licenses in Foxit Admin Console deployed in your enterprise. The assigned users use the assigned accounts to log in to Foxit eSign. You can click Manage Users in the Account Users page to add user accounts, assign licenses to users, and manage users in Foxit Admin Console. For details, please refer to Foxit Admin Console User Manual.
You are allowed to edit users in the user list such as the role or access level after clicking the Edit icon ![]() in the Actions column.
in the Actions column.
Administrator and Super Administrator roles are allowed to perform setups. Regular users cannot perform any setups. Admin or Super Administrator can be assigned as the manager for regular users.
Address Book Settings
Address book is used for:
- Easily selecting the contact/recipient while sending any document for electronic signatures.
- Manually adding the recipient email addresses to the email group.
When document is sent to a new recipient, he/she is automatically added to the address book. In case of error in name or email address while sending, if the recipient information is corrected, manual resend/reminder can be used to send the invitation to the corrected contact.
Account users from the same company are not added to the address book.
Steps to Manage Address Book
See how to create the contact list of whom you frequently do business with or send documents to.
- Click on ‘Address Book’ subtab under ‘Settings’ tab.
- You can simply add contacts by clicking on “Add New Contact”.
- Enter the contact name, email, organization and description.
- Click on ‘Add New Party’ button to add a user.
- You may also upload contacts through excel. For that, you need to click on the excel icon.
- Download the sample excel file and update the contacts then upload the excel file.
- Alternately if you have super administrator access, you can edit other party information by clicking on the edit icon against the record. Click on ‘Update’ button to save the changes or click on ‘X’ on top right to close without saving.
Email Groups Settings
Address Book contacts can be grouped together to form email groups which are used while sending a document for bulk signatures.
Steps to create an email group:
- Click on the ‘Email Groups’ sub-tab under the ‘Settings’ option.
- You may create the email group by clicking on “Create new email group”.
- Enter the email group name and description then click on the ‘Add’ button.
- Click on the edit icon, choose the email address to add the contacts and then click on update.
- You may also upload the contacts in the email group through excel.
- You need to download the excel file and fill the contact details with a specific email group and upload it. Once you choose the file, the program will automatically upload the file and refresh the page with new or updated email group information.
Now you are ready to use the bulk eSignature functionality.
Email Templates Settings
In this section, you will learn how to manage the notifications under the ‘Email Templates’ tab. You can personalize the email notifications language to suit you or your organization’s style or you can use the default notifications as is. You can also create new notifications that other parties will receive the first time when you send the document for signatures.
Steps to Manage Email Templates
You can create multiple new invitation templates and save and edit the other notification template language as required.
Steps to Create Your Own Invitation Templates
Email templates help you create predefined email(s) language that you can use while sending documents for eSigning.
- Click on the ‘Email Templates’ subtab under the ‘Settings’ tab. You can create multiple invitation email templates by clicking on the ‘Create New’ button in ‘All Invitation Email Templates’ section.

- Create name, description and subject for the email notification template you are creating. Enter text for your email subject and body. You can use ${document_title} in the subject line to indicate the name of the document.
- You can use field tags in your template by selecting ‘Use a Pre-Defined Field’, like Document Title, Receiver Name and Sender Name. These tags will be replaced by actual value when the email is sent to the user.
- Save your work by clicking on the ‘Save’ button.
- You can save any one of your invitation email templates as default from the list which will be auto-selected while sending the documents to your users, also this default email template can be used while sending documents via Online Forms.
Steps to Edit Email Templates
Follow the steps to edit the notification template.
- Click on the ‘Email Templates’ subtab under the ‘Settings’ tab.
- Click on any template under ‘All Notification Email Templates’ to view the notification language.
- Edit as required. You can insert dynamic values from the database by selecting from the drop down ‘Use a Pre-Defined Field’. Click on ‘Update’ to save the changes.
Note: Use ‘Send Sample’ to send yourself an email sample to test how this email notification will be displayed to the other party. Also pay attention to the hints at the bottom of the page as they will give you helpful information.
Personal Profile Settings
In this section, you will learn about the settings for your personal profile.
Steps to Update Personal Profile
- Any user with any access level can click on the name on top right corner and from the drop-down select ‘My Profile’ to update their own profile.
- Edit your department, title/position in the Change profile section.
To change your name, do the following:- Individual users go to the profile page of The Foxit website and change the name.
- Enterprise users need to contact their administrators.
- You can select options to receive specific notifications via email. Deselecting the option will stop the specific email notifications.
- To change your password, do the following:
- Individual users click Forgot Password on the Foxit eSign login page to reset the password or go to the profile page of the Foxit website to change the password.
- Enterprise users need to contact their administrators.
- To update or change the signature, click on “Change Sign” a window will open you may select the option to add your signature via Type, Draw or attach.
- Add your signature and save it.
- Click on “Change Initial” add your signature and save it.
- After saving the initials will get stored.