How to Capture eSignatures Using an Online Form/URL Link
Foxit eSign online link/URL can be created from a template where a document can initiate by:
- The first signer who must sign the document using an online link/URL and additional signers sign via email notifications from Foxit eSign.
- Any person with a draft link (or authorized individual if draft URL form is password protected) under draft status. The initiator using the draft link do not need to sign and is not counted as one of the recipients. The initiator can simply fill the form and send for eSignatures to the additional signers.
This functionality is only available to Foxit eSign Pro and Foxit eSign Enterprise customers.
- A reusable template can be created from the home page by uploading a PDF document. This is already covered in a separate video. If you have already created a template, you can navigate to the template page to create an online document.
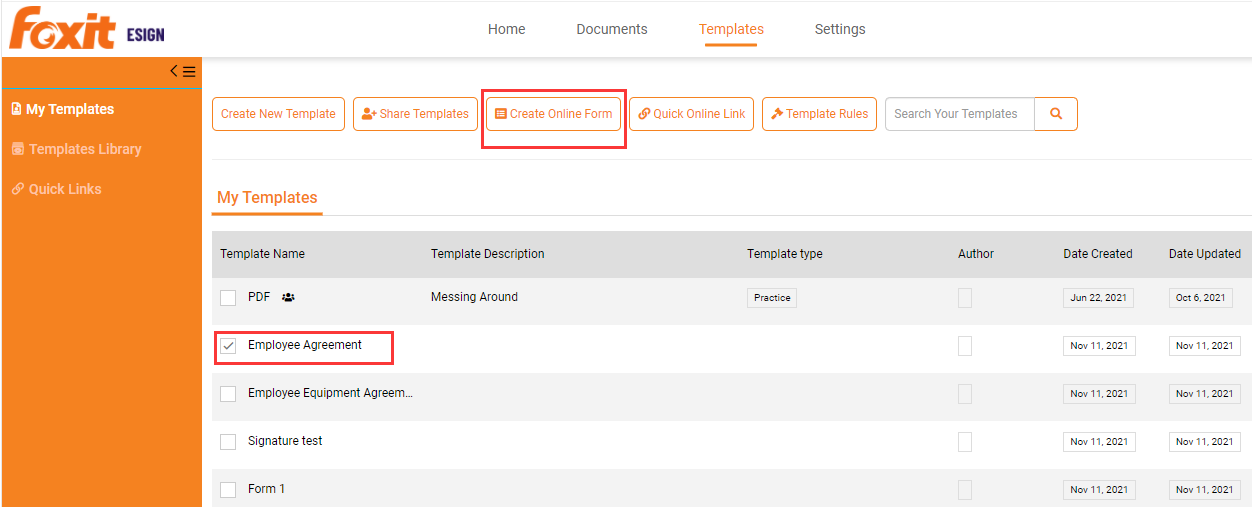
- Select one or more templates from the home page or from your templates page and click on the ‘Create Online Form’ button.

- Next few steps will tell you more on how to select options while creating the online form.
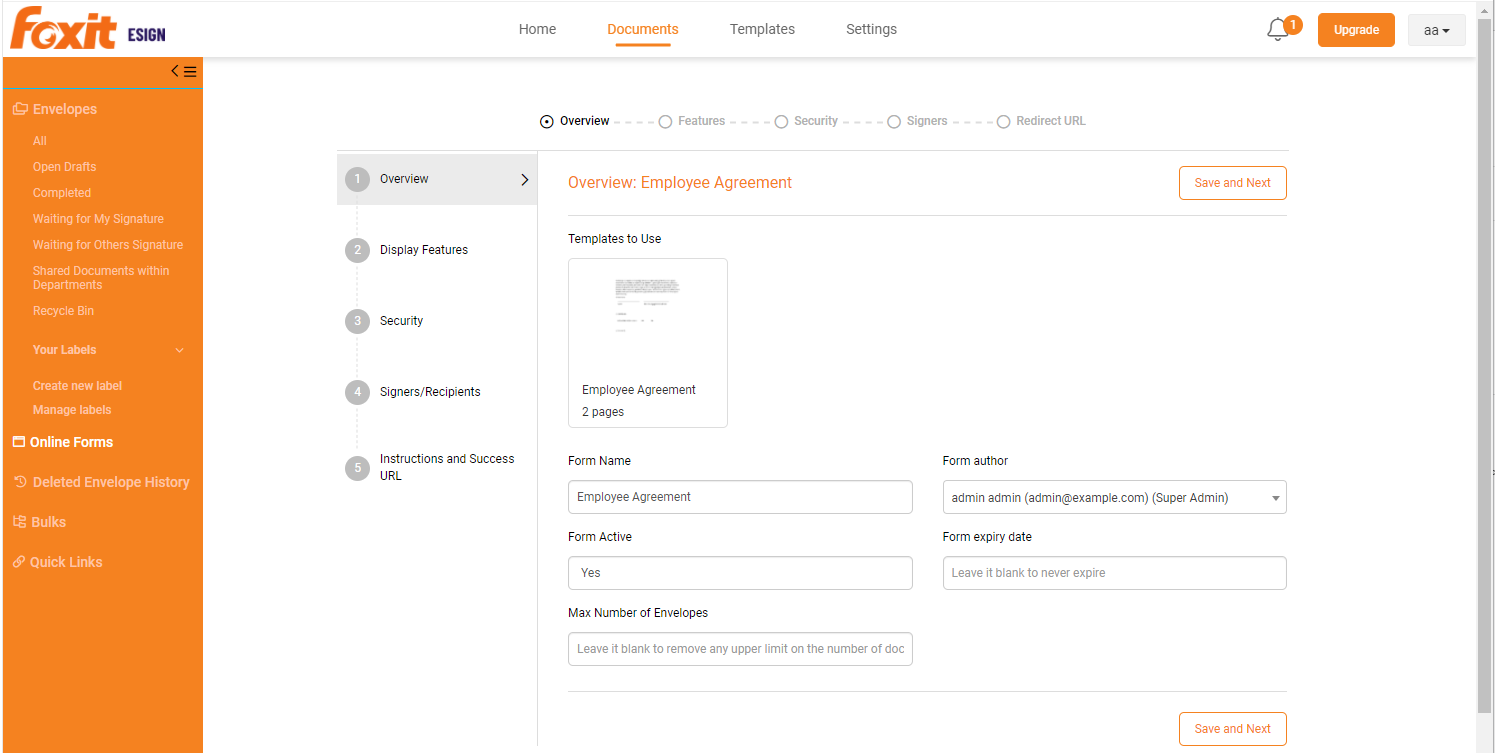
- Enter a meaningful Online Form Name that will display to the signer when he opens the link for eSigning.

- Check ‘Form active’ box to make the online form active for signing purpose. You may disable the form by unchecking anytime later.
- ‘Validate signer email’ is extra security measure to ensure that the person who is signing is actually linked to the valid email id that you sent the document to. It is recommended to keep this checked as Yes but enabling this adds one extra validation step for the signer.
- Selecting ‘Show Document Fields on Form’ will first show a fillable form with all the fields on the document. When the signer submits after entering the information on a form, document will open. Signer can then simply sign and complete the document.
- If ‘Show Document Fields on Form’ is not checked, online link simply gives access to the signer to the document or contract that will be filled out and signed. Form success URL will be used to redirect the signer to webpage of your choice like your company product offerings or knowledgebase etc. after the document has been signed.
- Check ‘Enable Extra Document Information Panel’ to view document related information on the right panel like attachments, history, comments, and recipients. A new option has been added to add a right panel while capturing online signatures to enable attachments.
- ‘Form Expiry Date’ is used when you want to end-date the online form at a certain cut-off date e.g. when the school enrollment date is over, the form becomes inactive automatically. Recipients who got email notification to sign the documents after the first signature is complete, can still sign the document provided the document is still valid (before expiration date of the document).
- ‘Max Number of Folders’ is for restricting the documents to a fixed max point as the name suggests.
- ‘Theme Color value changes the color or the document frame and signature frame to match with your website or branding. This color is the hex color value e.g. #45BA01.
- You may also add the instructions which will be displayed on the online form and give the signer information related to the document or contact.
- You can only enter either redirect URL in ‘Form Success URL‘ or ‘Form Success Message’ when the signer completes the eSignature process.
- ‘Draft URL options’ is for special cases when the initiator is not a signer but he/she just needs to fill some information before sending the document for electronic signature(s). Enable ‘Also generate a Draft URL for this form’ option to use the draft URL/online link. Initiator can follow the document by enabling the option ‘Send a notification mail to the form author whenever a new document is sent via Draft URL’.
- Select or deselect ‘Enforce Sequence Workflow’ if the document is going to be signed by 3 or more parties. First person to get the link will always initiate the document and sign it first and then only the document will go to additional parties. Add email of the second signer by using ‘Add Me’ or Add New as required. There are use cases where the first signer/initiator knows the second or subsequent signer name or email, the initiator can use ‘Details Required by Form Initiator’ option. You can add recipients permission and description/role. ‘Allow Initiator to add comments for this Recipient’ option allows the form initiator to send a specific note along with the document invitation email. ‘Auto Suggest Name from Account Users’ option will allow initiator to select the name of one of the account user in the recipient box and ‘Make Optional’ will provide option to enter the additional signer name only if required.
- Update the access privilege of the other recipients depending on whether they are signing the document or not. Save your work to create the form.
- Enter a meaningful Online Form Name that will display to the signer when he opens the link for eSigning.
- Copy the link to send to the first signing party. Or copy the embedded code under the “Embed link in your website” section and paste it on your website page (code). This will be iframe on your website.
Tip: If you need a copy of the same form to be filled out by a group of users, you can distribute the same link to multiple users. Each recipient can sign their copy of the document by clicking on the link. - First signing party clicks on the link received.
- The link takes the signer to provide his or her information prior to displaying the document or contract to be signed. Please note that the logo on this page will be replaced with your logo if you have uploaded one in the settings.
- Signer can check the access code received on the email id provided on the online form.
- Entering a valid access code provides signer access to the document and contract.
- Signer can click on the ‘Validate’ button on the left to proceed to signing the document.
- Click on the blue highlighted field to sign the document.
- The signer can choose one of the signature options to eSign.
- eSignature confirmation completes the process and redirects the signer to the page specified on the online form. Next signer will get email notification and can complete the eSigning steps by clicking on the document link received in the email.
- The sender or author of the document can now monitor the progress of signatures by logging back in and navigating to the online document page.
- If the sender is also the next signer, he or she can simply click on the ‘View Folder’ link next to the document and sign the document.
- When all parties complete signing, document executed notification is sent to each signer. Each signer can download the signed document with signature certificate or email themselves a PDF copy of the signed document.
Instructions to Generate Dynamic URL
Instructions to Generate Dynamic URL:
Online form initial page requires the user to enter signer first name, last name and email before allowing them access to the document to be signed. However, if you have collected this information on your website and you can pass those as parameters using dynamic URL during opening the online form and the signer does not need to enter the duplicate information again. Below are the steps to be followed:
- To bypass form submission, you need to pass ‘escapeForm=true’ parameters in URL. Else if you don’t want to bypass the form submission keep it as ‘escapeForm=false parameters in URL. Hence this is a mandatory parameter.
- For passing initiator field values, you need to pass below parameters:
&signerFirstName=value&signerLastName=value&signerEmailId=value - For passing other recipient parties values (if any non-fixed recipient exist), you need to pass below parameters:
&party_2_firstName=value&party_2_lastName=value&party_2_email=value
For 2nd non-fixed recipient party (if any)
&party_3_firstName=value&party_3_lastName=value&party_3_email=value - For passing template field values, give the field name defined in the template in the query parameter:
&field_name_in_template=value
Important: To be able to pass the field values with the URL, please enable the ‘Show Document Fields on Form’ on the ‘Display Features’ tab of the specific online form.For some reason, if you need to fill the field values and not show on the modal, you can pass an additional parameter “hideFormFields=true”. - For checking/unchecking any checkbox, pass ‘true/false’ as its value.
Example:
&checkbox_name_in_template=true or &checkbox_name_in_template=false - Maximum of two(2) custom fields can be added with the dynamic URL that do not show on the form but used as metadata for the folder. Custom fields are passed back with the folder information via the webhook response each time. You can add any custom field and value information in this format:
CustomField1=fieldname&fieldname=12345
Example: CustomField1=SalesforceObjectID&SalesforceObjectID=132121212
Example to generate sample URL:
With form fields (excapeForm ‘true’ value will take the user directly on the filled out form to sign).
https://foxitsign.foxit.com/eSign/onlineforms/fillOnlineForm?encformnumber=cSLa%2FpwC4aWS2Bh2GPFh9A%3D%3D&type=link&signerFirstName=DummyFirstName&signerLastName=DummyLastName&signerEmailId=qa_astest150@onlinetimetracker.us&CompanyName=Foxit eSign&Name=testname&StartDate=06282018&ServiceYes=true&Male=true&escapeForm=true
With form fields (excapeForm ‘false’ and hideFormFields=true will hide the form field but will allow the signer to update their own or additional signer names).
https://foxitsign.foxit.com/eSign/onlineforms/fillOnlineForm?encformnumber=cSLa%2FpwC4aWS2Bh2GPFh9A%3D%3D&type=link&signerFirstName=DummyFirstName&signerLastName=DummyLastName&signerEmailId=qa_astest150@onlinetimetracker.us&CompanyName=Foxit eSign&Name=testname&StartDate=06282018&ServiceYes=true&Male=true&escapeForm=false&hideFormFields=true
With custom fields:
https://foxitsign.foxit.com/eSign/onlineforms/fillOnlineForm?encformnumber=cSLa%2FpwC4aWS2Bh2GPFh9A%3D%3D&type=link&signerFirstName=DummyFirstName&signerLastName=DummyLastName&signerEmailId=qa_astest150@onlinetimetracker.us&CompanyName=Foxit eSign&Name=testname&StartDate=06282018&ServiceYes=true&Male=true&CustomField1=SalesforceObject&SalesforceObject=lead&CustomField2=SalesforceObjectID&SalesforceObjectID=132121212&escapeForm=true
Notes:
- Use ‘&’ as a separator for all parameters.
- Use ‘%20’ or ‘+’ as a space in the value.
Example: **&Comments=This%20is%20a%20long-term%20contract%20** will display comments value as 'This is a long term contract'. - For checkboxes and radio buttons pass values as true/false.
- If having any trouble getting field names, please right-click on the field and then click ‘inspect/inspect element.’ Copy the value of the name (e.g. name=”signerFirstName”) and pass it in url like &signerFirstName=xyz.