Image Annotation
Images
You can specify a rectangle on any part of a PDF page and then insert an image into that rectangle. This feature is helpful when you want to explain or show something more dynamically. For example, a section of an article you are reading needs an explanation, and you realize that maybe an image will be the best answer. You can add an image with the image command in Foxit PDF Reader.
Add an Image
You can add an image to a PDF with the Image Annotation command. After you insert a new image, you can adjust its size and position, change the appearance and other settings.
To add an image, do the following:
Choose Home > Image Annotation.
Drag a rectangle on the page to define the canvas area for the image.
In the Add Image dialog box, click the Browse button to select the image that you want to insert and click the Open button. You will see the URL of this image has been added to the Location field.
(Optional) If you find that you chose the wrong image, click the Browse button again to select the correct one.
Click the Advanced button to edit the settings of the image.
A. When to scale – choose when to scale the image you insert. There are four options:
a) Always: scale the image to fit the rectangle you draw.
b) Icon is too big: zoom out the image to fit the rectangle if the former one is bigger than the latter one, or show the image with its original size.
c) Icon is too small: zoom in the image to fit the rectangle if the former one is smaller than the latter one, or show the image with its original size.
d) Never: never scale the images. Show the image with its original size all the time.
B. Scale – choose to scale the image non-proportionally or proportionally. This option will be disabled when you select Never in the field of When to scale.
a) Non-proportionally: scale the image to fit the rectangle when the magnification is changed.
b) Proportionally: scale the image by its proportions.
C. Border – drag and move the scroll bar to change the image’s position in the rectangle. The coordinates change when you move the scroll bar.
Click OK for your changes to take effect, or click Reset to reset the data to the original settings.
To rotate the image, click and select one of the options.
Click OK.
Move and Resize an Image
You can move and resize an image after inserting.
Move an Image
Select the Select Annotation command or the Image Annotation command, put the pointer over the image so that the handle appears.
Click and drag the image to another place you like.
Resize an Image
Select the Select Annotation command or the Image Annotation command, put the pointer over the image so that the handle appears, and then click the image.
Place the cursor on any corner point. Pointer changes into the cursor showing the direction at which the rectangle will be resized.

To Resize the Image
Dragging the cursor outside will increase the size of the rectangle proportionally. Drag the cursor inside, and it will decrease the size of the rectangle proportionally.
Set Properties of an Image
Double-click the image, or right-click it, and select Properties.
In the Settings tab, follow the steps in “Add an Image”.
In the Appearance tab, do any of the following:
A. Annotation is hidden from view – Check the option to make the image you inserted invisible or uncheck the option to lay the image over the content of PDF.
B. Border – Change the type, width, style and color of the rectangle’s border.
Width: choose to show the rectangle’s border or not, as well as the width of the border. If No border is selected, the Style and Color will be disabled.
Style: choose the style of the border line, solid or dashed.
Color: change the color of the border. Click the color button to select any color you like, or click Other colors to choose a customized color.
(Optional) Check Locked to avoid modifying your settings.
Delete an Image
Select the Select Annotation command or the Image Annotation command.
Do one of the following:
Ø Select the image, and press the Delete key.
Ø Right-click the image and choose Delete from the drop-down window.
Work with Multiple Images
Select Multiple Images
Select the Select Annotation command or the Image Annotation command.
Press and hold Shift or Ctrl and click the images you want to edit.
Arrange Images
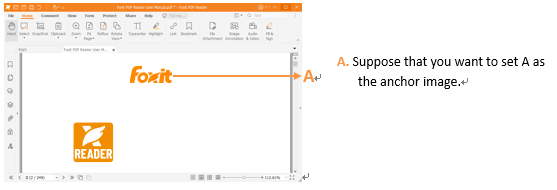
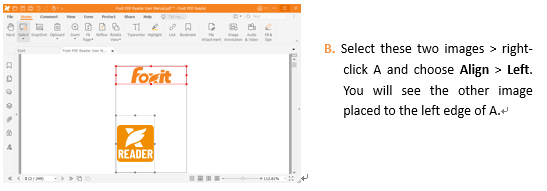
You can align the selected images left, right, top, bottom, vertically, or horizontally. Select one of the images as the anchor, and the rest of the images will be placed respectively to the left edge, right edge, top edge, bottom edge, vertical axis or horizontal axis of the anchor image.
1. Arrange images through the Format panel
Select the Select Annotation command or the Image Annotation command.
Click the image, and then the Format panel will be called out.
Follow the steps specified in “Arrange measurement markups through the Format panel”.
2. Arrange images via the context menu
Select the Select Annotation command or the Image Annotation command, and choose the images that you want to arrange.
To align the images based on an anchor object:
Ø Right-click the anchor, and then choose a command in the Align menu as follows:
A. To align a column of images, choose Left, Right, or Vertically to align them respectively to the left edge, right edge, or vertical axis of the anchor image.
B. To align a row of images, choose Top, Bottom, or Horizontally to align them respectively to the top edge, bottom edge, or horizontal axis of the anchor image.
Note: The align menu commands move the other selected images to line up with the edges of the anchor image.
Below is an example:


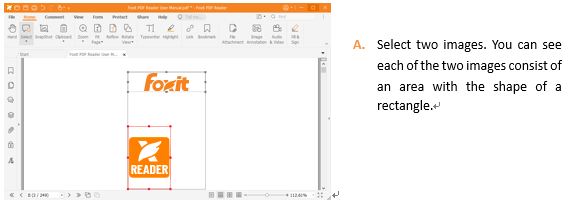
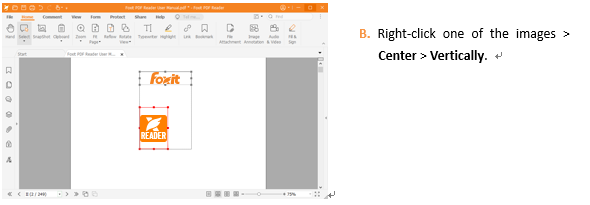
To center the images:
Ø To center the images vertically on a page, choose Center > Vertically.
Ø To center the images horizontally on a page, choose Center > Horizontally.
Ø To center the images vertically and horizontally on a page, choose Center > Both.
Below is an example:


To distribute images:
This function will be available when selecting three or more images.
Ø To distribute the images evenly between the topmost and bottommost images, click Arrange > Vertically in the Distribute group.
Ø To distribute the images evenly between the leftmost and rightmost images, click Arrange > Horizontally in the Distribute group.
Below is an example:


Resize Multiple Images
You can adjust multiple images with the same height, width, or both. Select one of the images as the anchor, and the rest of the images will be resized with the same height or width as that of the anchor image.
Below is an example:


Set Properties of Multiple Images
Select multiple images > right-click one of them > Properties.
A dialog pops up with an Appearance tab. Follow the steps specified in “Set Properties of an Image”.